If you store large files in PikPak and want to move them to MEGA, the traditional download-and-upload method can quickly become frustrating.
You may need to download files from PikPak to your computer first, wait for a long time, make sure your local disk has enough space, and then upload everything again to MEGA. For small files, this may be acceptable. But for large videos, backup folders, compressed files, or many files, this process is slow, unstable, and easy to interrupt.
That is why many users look for a better way to migrate PikPak to MEGA without downloading files to their computer.
In this guide, we will explain several practical methods to transfer files from PikPak to MEGA. The most beginner-friendly method is using RiceDrive, an online cloud transfer tool that can connect PikPak through WebDAV and move files directly to MEGA.
Quick Answer: What Is the Best Way to Transfer PikPak to MEGA?
The easiest way is to use RiceDrive.
With RiceDrive, you can connect PikPak and MEGA, select the files or folders you want to transfer from PikPak, choose a destination folder in MEGA, and start a cloud transfer task. You do not need to download the files to your computer first.
For advanced users, Rclone can also be used with PikPak WebDAV and MEGA. However, it requires command-line setup and is not as simple for beginners.
If you only need to move a few small files, manual download and upload can still work, but it is not recommended for large migrations.
Why You Should Avoid Manual Download and Upload
Manual migration looks simple, but it has several hidden problems.
First, it depends heavily on your local computer. If you are transferring large folders, your computer needs enough disk space to temporarily store everything downloaded from PikPak.
Second, it consumes your local bandwidth twice. You download the files once from PikPak, then upload the same files again to MEGA. This makes the whole process much slower than a direct cloud-to-cloud transfer.
Third, large file transfers are easier to fail. A browser crash, unstable Wi-Fi, power issue, or upload timeout may interrupt the migration. After that, you may need to check files manually and continue the transfer yourself.
For users who want to migrate many files, videos, or folders, a cloud transfer method is usually more practical.
Method 1: Migrate PikPak to MEGA with RiceDrive
RiceDrive is the recommended method for most users because it does not require command-line knowledge. You only need to connect PikPak and MEGA, then create a transfer task.
Step 1: Log in to RiceDrive
Go to RiceDrive and log in with your email address. RiceDrive uses email verification code login, so you can enter your email and complete the login with the code you receive.
After logging in, you can start adding your cloud storage accounts.
Step 2: Enable WebDAV in PikPak
Before you add PikPak to RiceDrive, you need to enable WebDAV in your PikPak account.
Go to the official PikPak website, log in to your account, and open the settings page. Then enable the WebDAV feature.
After WebDAV is enabled, PikPak will provide the connection information you need, including:
Server Host
Username
Password
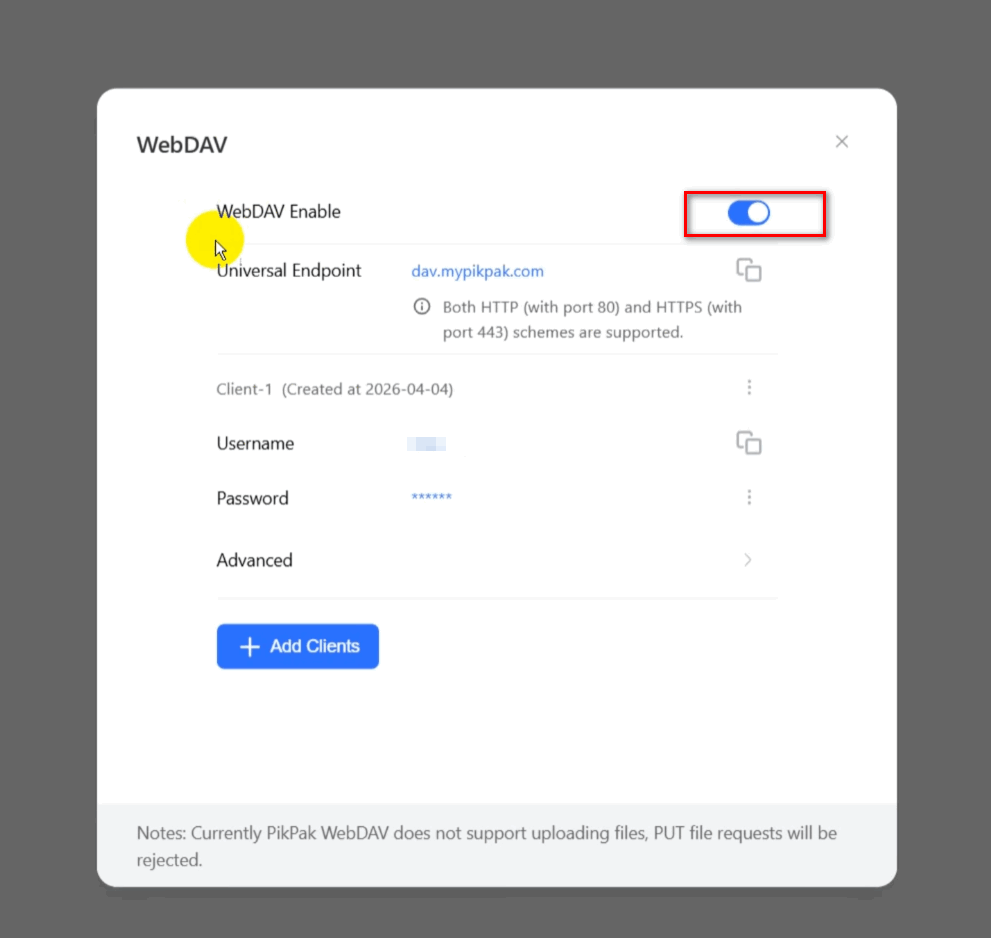
A common issue is entering an incomplete Server Host. Make sure the host address includes both https:// and the port number. For example, the format should look like this:
https://your-domain:port
If the host address is missing https:// or the port number, the connection may fail.
Step 3: Connect PikPak to RiceDrive
Open the Link Drive page in RiceDrive.
Choose PikPak or WebDAV as the cloud storage type, then paste the Server Host, Username, and Password into the matching fields.
After filling in the information, click the connect button.
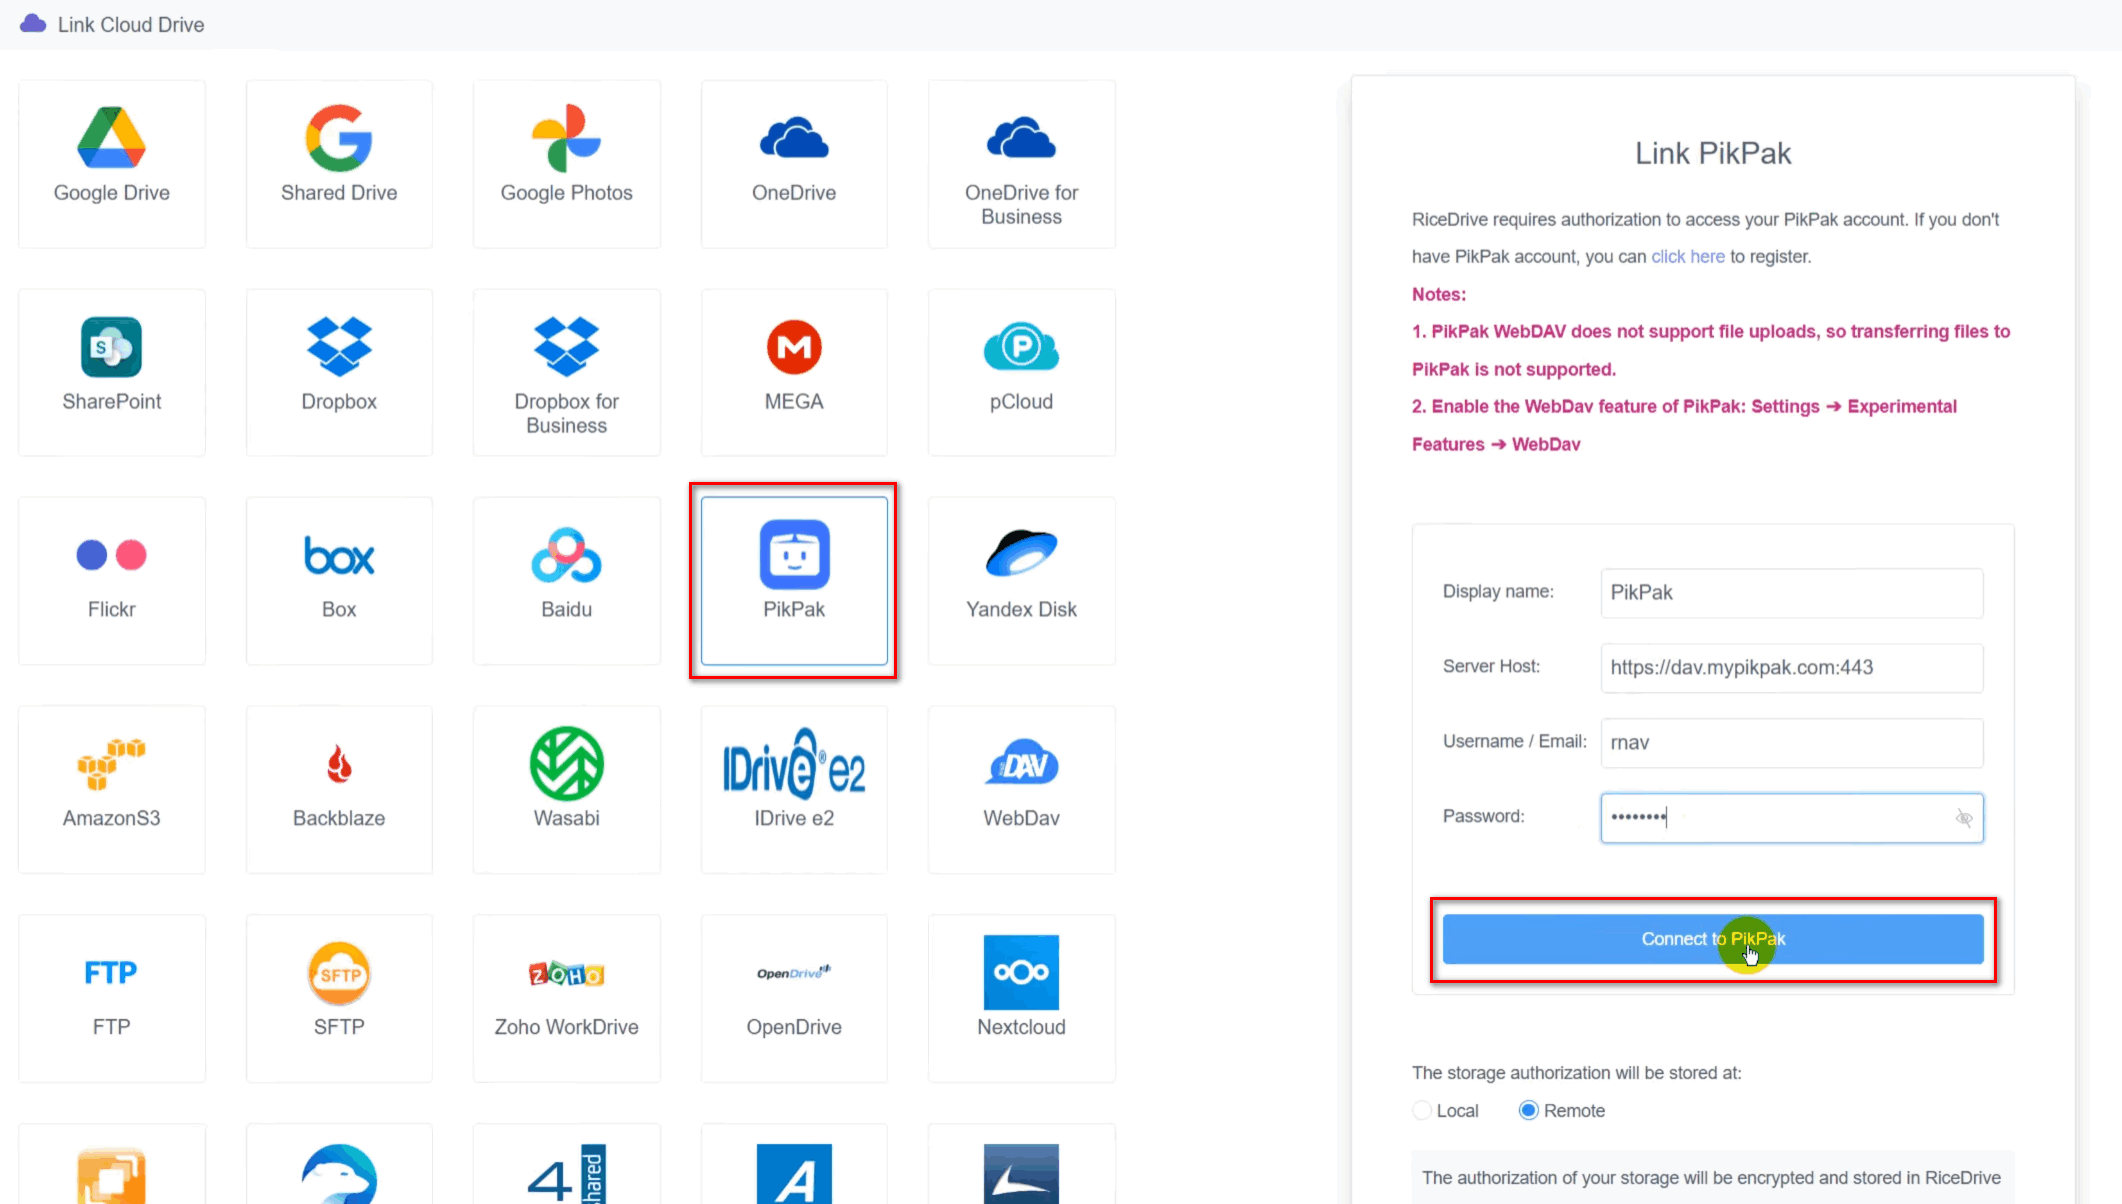
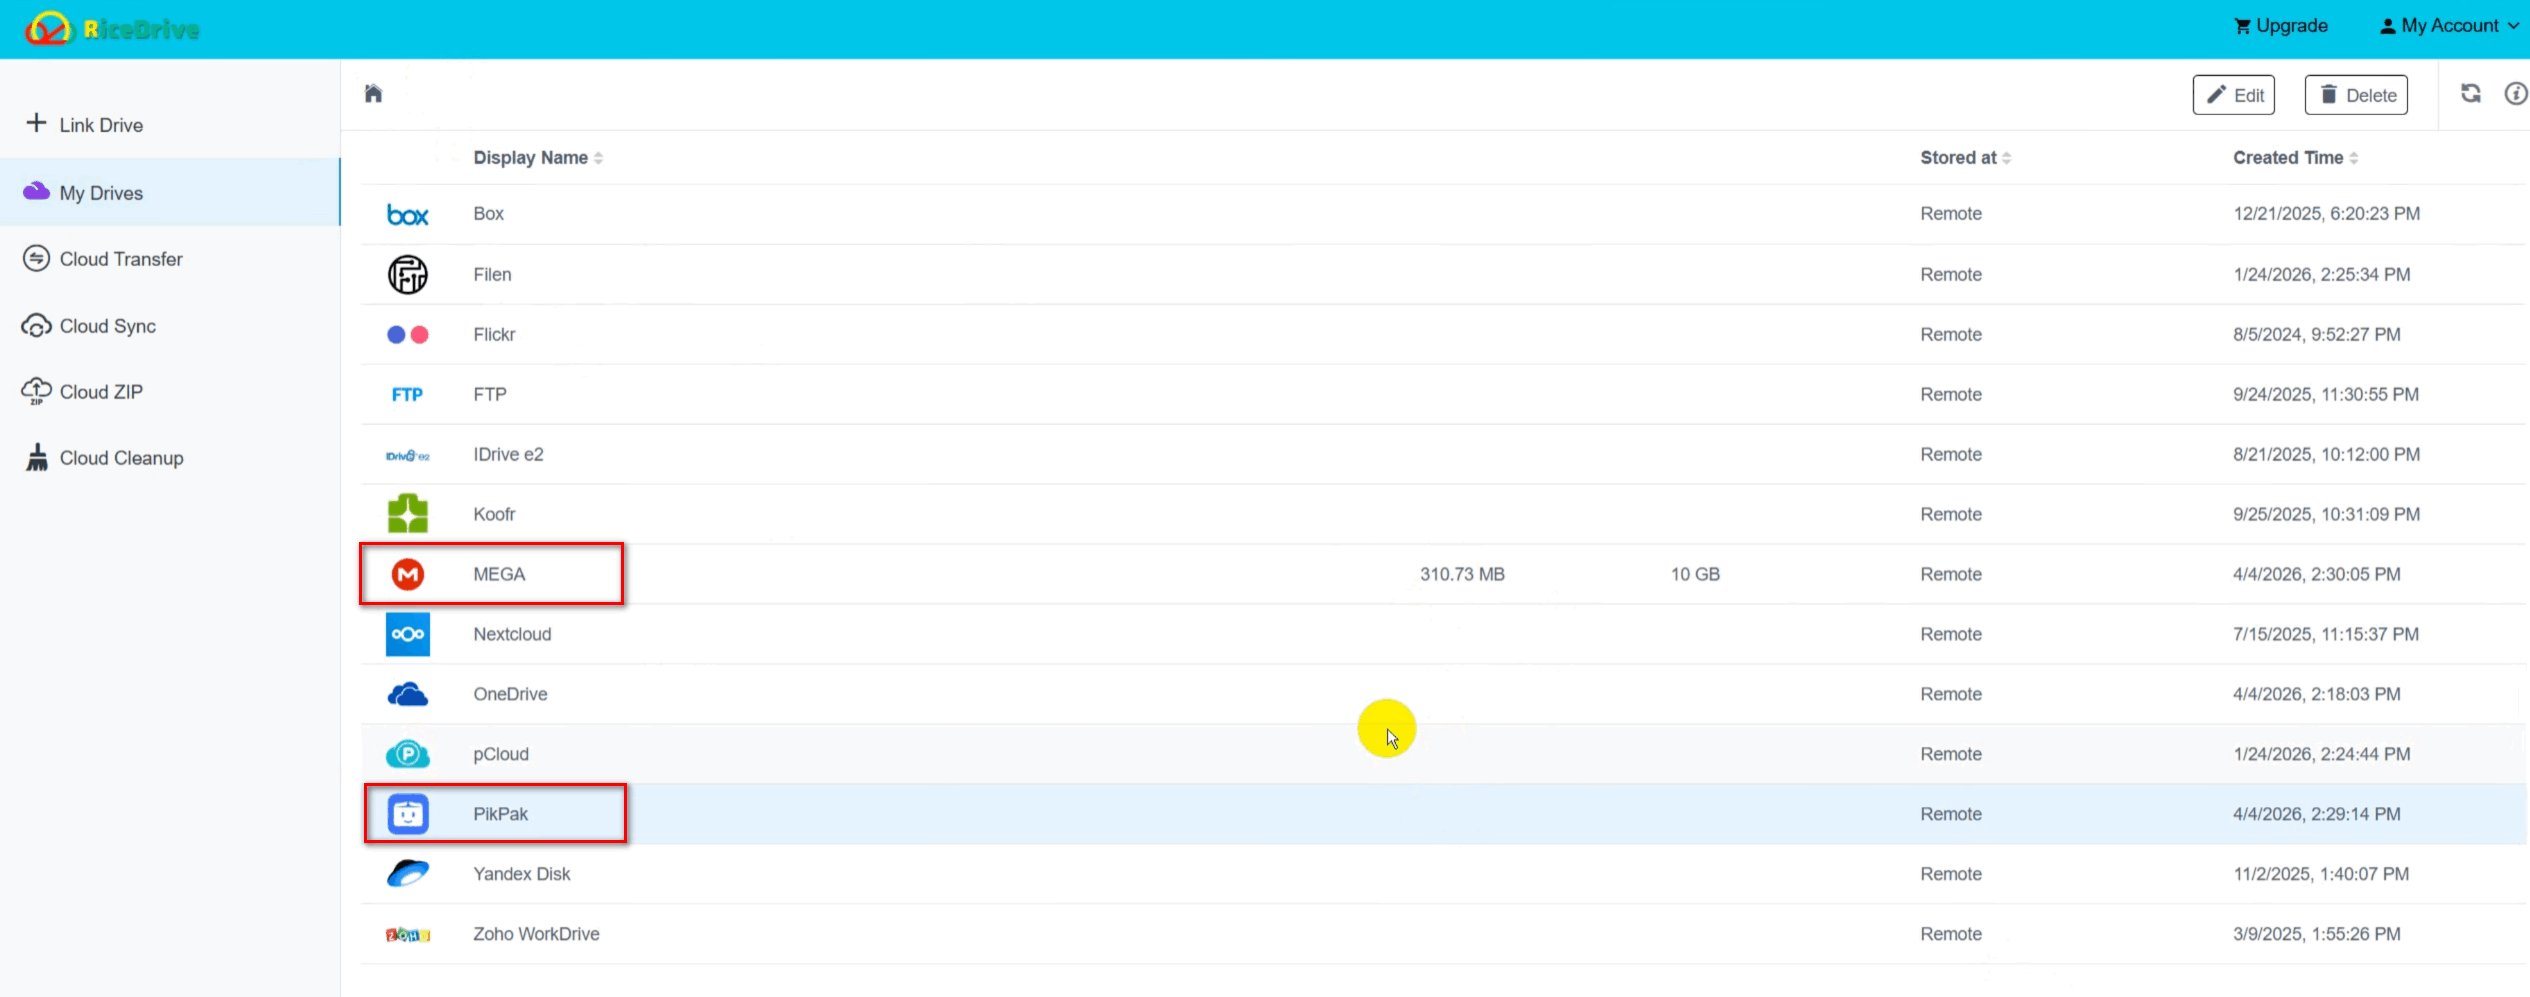
If the WebDAV details are correct, PikPak will be successfully connected to RiceDrive. You can also go to the My Drives page to confirm that PikPak has been added.
Step 4: Connect MEGA to RiceDrive
Go back to the Link Drive page, choose MEGA, enter your MEGA account information, and click the connect button.
Now both PikPak and MEGA are connected to RiceDrive, which means you can start the migration.
Step 5: Create a Transfer Task from PikPak to MEGA
Open the Cloud Transfer page in RiceDrive.
In the source area, choose the files or folders you want to transfer from PikPak.
Then, in the target area, choose a destination folder in MEGA to save the files transferred from PikPak.
The transfer direction should be clear:PikPak → MEGA
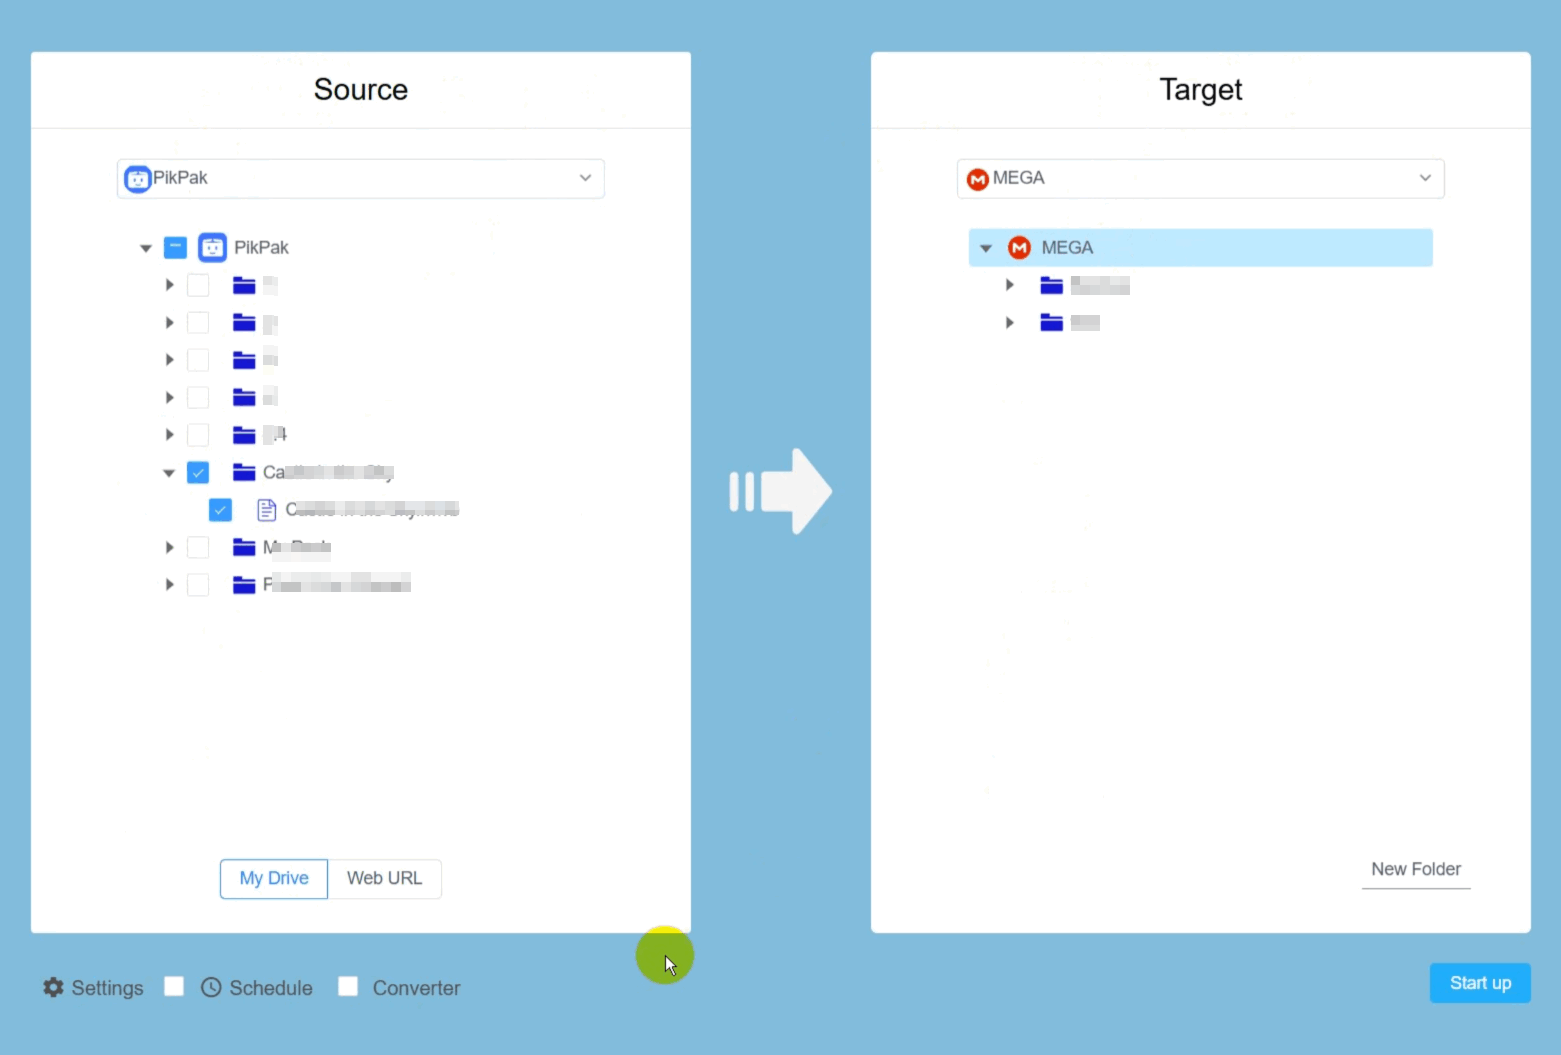
Step 6: Configure Transfer Settings
Before starting the task, you can configure additional transfer settings.
For example, you can set filter conditions if you only want to transfer certain file types. This is useful when you only need to move videos, documents, archives, or specific folders.
You can also define how to handle existing files in the MEGA target folder. This helps avoid confusion if files with the same name already exist.
If you want to run the transfer regularly, you can use schedule settings to create a daily or weekly transfer plan. This is helpful if you often add new files to PikPak and want to move them to MEGA automatically.

Step 7: Start the Transfer Task
Once everything is configured, click “Start” to create and run the transfer task.
After the task starts, you do not need to keep the webpage open all the time. RiceDrive can continue running the task in the background, so you can close the page and focus on other work.
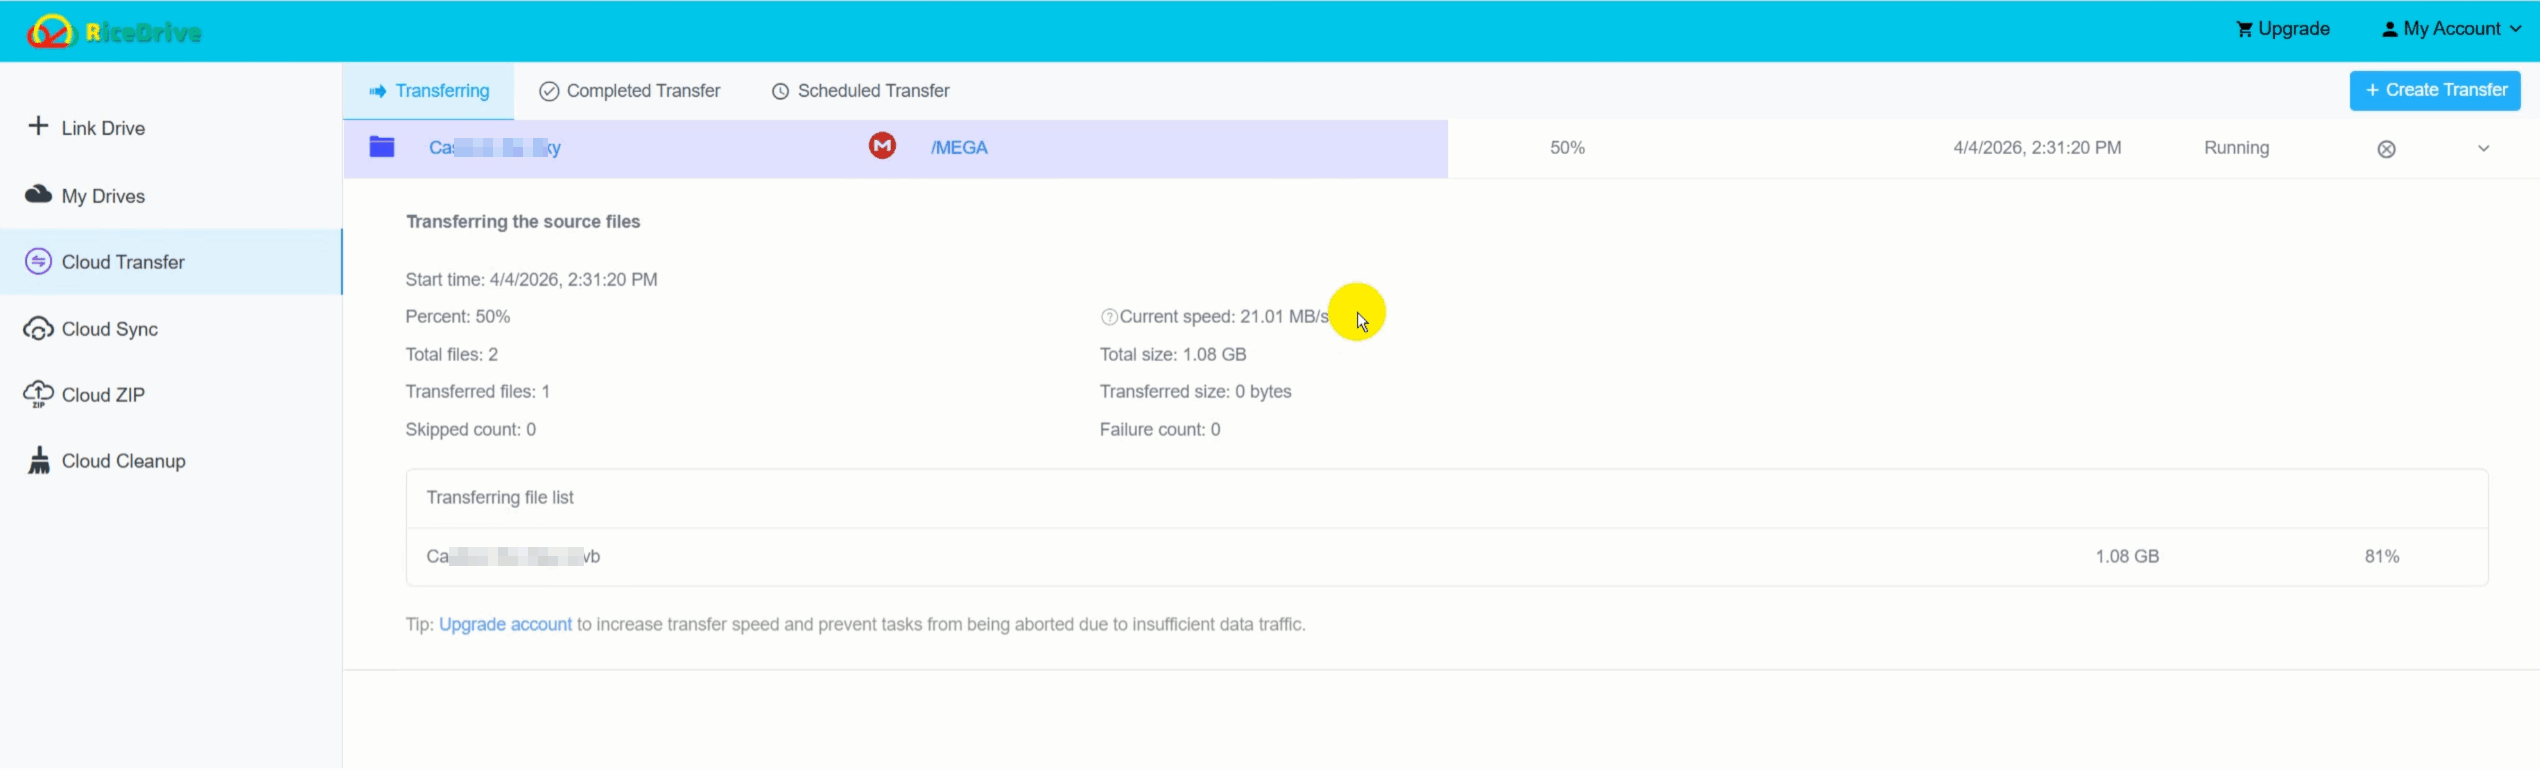
When the task is completed, check the logs to confirm that all files have been transferred successfully.
Tip: The original files will remain in PikPak and will not be deleted automatically. RiceDrive transfers files to MEGA, but it does not remove the original files from PikPak unless you manually delete them later.
Practical Tips for Using RiceDrive
To make the migration smoother, check these details before starting the transfer.
First, make sure PikPak WebDAV is enabled. Without WebDAV, RiceDrive cannot connect to your PikPak account.
Second, check the Server Host format carefully. It should include https:// and the port number.
Third, make sure your MEGA account has enough available storage space. If MEGA does not have enough space, the transfer may fail or stop before completion.
Fourth, use filters when you do not need to migrate everything. For example, if you only want to move video files, filters can help keep the task cleaner.
Finally, always check the task logs after the transfer is complete. Logs are useful because they help confirm whether the migration was successful and whether any files failed.
Method 2: Use Rclone with PikPak WebDAV and MEGA
Rclone is another practical method for transferring files from PikPak to MEGA, especially for technical users.
The basic idea is to configure PikPak as a WebDAV remote and configure MEGA as another remote. Then you can use Rclone commands to copy files from PikPak to MEGA.
To avoid downloading files to your personal computer, you can run Rclone on a VPS, NAS, or cloud server. In that case, the transfer runs through the server instead of your local computer.
A typical workflow looks like this:
Enable WebDAV in PikPak.Copy the PikPak Server Host, Username, and Password.
Install Rclone on your computer, VPS, or NAS.
Configure PikPak as a WebDAV remote.
Configure MEGA as a MEGA remote.
Use an Rclone copy command to transfer files from PikPak to MEGA.
This method is powerful, but it is not ideal for every user.
You need to understand command-line tools, remote configuration, paths, transfer logs, and possible error messages. If something fails, you may need to troubleshoot it yourself.
For users who already have a VPS or NAS and are comfortable with technical setup, Rclone can be a flexible option. For beginners, RiceDrive is usually much easier.
Method 3: Download from PikPak and Upload to MEGA Manually
The manual method is the simplest to understand, but it is also the least efficient.
You download files from PikPak to your computer, then upload them to MEGA through the MEGA website or desktop app.
This method may work if you only have a few small files. For example, if you only need to move one document or a small folder, manual transfer may be enough.
However, it is not a true “without downloading” method. It also has several limitations:
It uses local disk space.
It consumes local bandwidth twice.
Large files may fail during download or upload.
Your computer must stay online.
You need to manually verify the final result.
For large folders, videos, archives, or long-term migration needs, manual download and upload is not recommended.
Method Comparison
Different methods are suitable for different users. If you want the easiest online method, RiceDrive is the best choice. If you are comfortable with command-line tools, Rclone can give you more control. If you only have a few small files, manual download and upload can still be used as a simple fallback.
| Method | Best For | Main Advantage | Main Limitation | Recommended? |
|---|---|---|---|---|
| RiceDrive | Most users, beginners, large folders, cloud-to-cloud transfer | Easy to use, no local download needed, supports background transfer, filters, and schedules | Requires connecting PikPak through WebDAV | Yes, best overall choice |
| Rclone | Advanced users, VPS/NAS users, technical migration tasks | Powerful and flexible, supports command-line control | Requires setup, command-line knowledge, and troubleshooting | Yes, for technical users |
| Manual Download and Upload | Small files or one-time simple transfers | Easy to understand, no extra tool needed | Uses local storage and bandwidth, slow for large files, not truly “without downloading” | Only for small files |
For most users who want to migrate PikPak to MEGA without downloading, RiceDrive is the most practical option. It keeps the process simple: connect PikPak, connect MEGA, choose the files, select the destination folder, and start the transfer task.
FAQ
Can I migrate PikPak to MEGA without downloading files to my computer?
Yes. You can use RiceDrive to create a cloud transfer task from PikPak to MEGA. This allows you to move files between the two cloud storage services without downloading them to your local computer first.
Do I need WebDAV for PikPak?
Yes. When using RiceDrive, PikPak must be connected via WebDAV. Enable WebDAV in PikPak, then copy and enter the Server Host, Username, and Password. Note: WebDAV requires the Pro version; the free version does not support it.
Will my original PikPak files be deleted after the transfer?
No. The original files will remain in PikPak. RiceDrive transfers files to MEGA but does not automatically delete the source files — you must manually delete them in PikPak if you no longer need them.
Which method is best for large files?
For large files or folders, RiceDrive is usually the best option for most users — it even supports single-file transfers larger than 100 GB.
Final Thoughts
Migrating PikPak to MEGA does not have to be a slow download-and-upload process. If you have large files, videos, or backup folders, using a cloud-to-cloud transfer method can save time and reduce local storage pressure. For most users, RiceDrive is the easiest and most practical way to migrate PikPak to MEGA without downloading.