Managing multiple cloud drives—pCloud, MEGA, Google Drive, Dropbox, and others—often leads to scattered files and inefficient workflows. If you're looking for a simple way to consolidate storage or switch platforms, a reliable cloud-to-cloud transfer tool becomes essential.
RiceDrive solves this problem by offering an easy, automated way to transfer files from pCloud to MEGA without manual downloads or uploads. In this guide, you'll learn how to use RiceDrive’s Transfer feature to move your entire pCloud library or selected files to MEGA in just a few clicks.
Introducing RiceDrive – Your Cloud Migration Simplified
RiceDrive is an intuitive cloud migration and file transfer platform that connects all major cloud services under one interface. It enables secure, server-to-server transfers between pCloud, MEGA, Google Drive, Dropbox, OneDrive, Box, and more.
Key Transfer Features:
-
Connect and manage multiple cloud accounts in one dashboard.
-
Direct server-to-server transfer (no need to download-to-local).
-
Fast bulk migration of entire folders while keeping original structure.
-
Transfer filters: include/exclude, skip, overwrite, rename.
-
Scheduled transfers for large or recurring migration tasks.
-
Detailed logs for validating completed operations.
-
100% free for personal cloud transfers (up to 10GB traffic).
With RiceDrive, your pCloud → MEGA Transfer becomes fast, automated, and error-free.
Linking pCloud and MEGA Accounts
-
Sign in to your free RiceDrive account.

-
Click "Link Drive", select pCloud, and authorize access.

-
Repeat the process for MEGA using your MEGA login credentials.

-
After linking both clouds, they appear in your RiceDrive dashboard and are ready for Transfer.
Once permissions are granted, RiceDrive can securely transfer files between pCloud and MEGA.
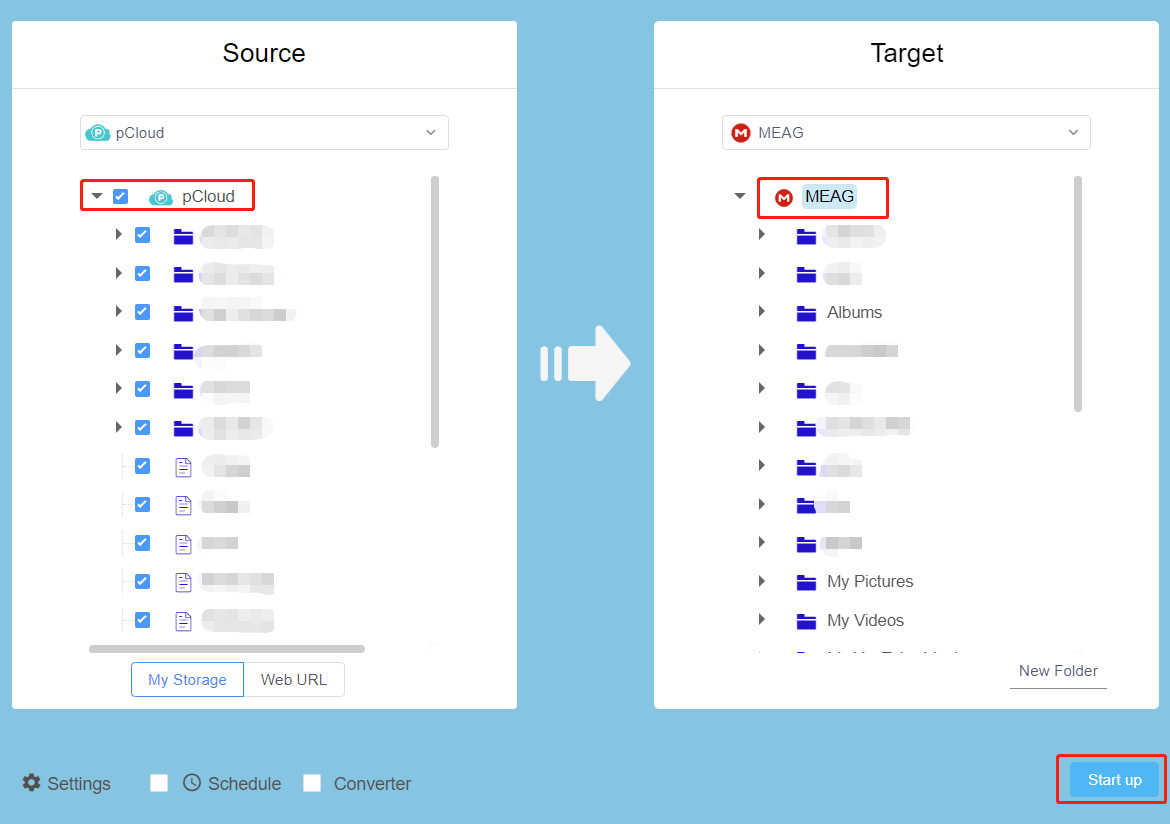
Selecting pCloud Content to Transfer
Within RiceDrive's file manager, you can browse pCloud and MEGA side-by-side. Here, you can select the specific data you want to migrate:
-
Open Cloud Transfer → Create Transfer.
-
Choose pCloud as the source, browse to the folder or files you want.
-
Select MEGA as the target.
-
Click Start up to run your transfer task.
-
Monitor real-time progress under the Tasks tab.
Your files will be instantly migrated to MEGA through encrypted, direct cloud-to-cloud transfer.
Managing Transfer Queue
From the Tasks panel, you can easily:
-
Track ongoing transfers with detailed per-file progress
-
Restart / cancel migration tasks
-
Review past transfer logs to confirm successful migration
RiceDrive ensures full visibility and control throughout the entire Transfer process.
Why Transfer From pCloud to MEGA?
-
1. More Free Storage
MEGA offers 20GB free storage—double that of pCloud’s 10GB—making it ideal for users needing more space at no cost.
-
2. Better Support for Large Files
MEGA allows uploads up to 20GB per file, while pCloud limits free users to 20MB and paid plans to 5GB.
If you transfer videos, raw media, system images, or backups, MEGA is clearly the better choice.
-
3. Strong Privacy & Collaboration Tools
MEGA uses true end-to-end encryption, providing exceptional security for personal or professional file sharing.
Share links, encrypted chat, and secure video meetings make MEGA perfect for privacy-focused users.
Conclusion
Switching from pCloud to MEGA gives you more free space, larger transfer limits, and better collaboration tools. But manually downloading and reuploading files is slow, risky, and inconvenient.
RiceDrive eliminates this hassle with automated, fast, and secure pCloud → MEGA cloud transfer. Simply link your accounts, choose your files, and start the migration—RiceDrive handles the rest.
If you're ready to consolidate cloud storage or move your data to a more flexible platform, start your pCloud-to-MEGA Transfer today with 10GB free traffic.