Migrating Zoho WorkDrive to OneDrive can become time-consuming when you rely on the traditional download-and-upload method. You may need to download hundreds of folders, store them locally, extract ZIP archives, and upload everything again. This consumes local storage, uses your internet connection twice, and makes large migrations difficult to monitor.
RiceDrive provides a more practical cloud-to-cloud workflow. It connects Zoho WorkDrive and Microsoft OneDrive in one browser-based interface, allowing you to select the source files, choose a destination folder, and run the transfer online. This guide covers the direct RiceDrive method, the free manual alternative, current OneDrive restrictions, validation steps, and common migration risks.
Why Migrate from Zoho WorkDrive to OneDrive?
Zoho WorkDrive is designed for team collaboration and centralized document management. However, organizations already using Microsoft 365 may prefer to consolidate their files in OneDrive.
Better Microsoft 365 Integration
OneDrive works closely with Word, Excel, PowerPoint, Outlook, Microsoft Teams, and SharePoint. Moving files into the Microsoft ecosystem can make it easier for employees to open, edit, share, and collaborate on documents using tools they already use.
Centralized Business Storage
Keeping business files across several cloud platforms can complicate access management and document organization. A migration can reduce the number of storage services your team needs to manage.
Common Migration Scenarios
- Moving from Zoho Workplace to Microsoft 365
- Consolidating cloud storage subscriptions
- Making documents easier to access from Microsoft Teams
- Backing up important Zoho WorkDrive folders to OneDrive
- Transferring project files to another team or organization
- Reorganizing company documents after a platform change
What Is RiceDrive? The Smart Cloud Migration Tool
RiceDrive is a web-based multi-cloud management and migration service. It connects supported cloud storage accounts—including Zoho WorkDrive, OneDrive, Google Drive, Dropbox, MEGA, Box, pCloud, FTP, and SFTP—and lets users create online transfer tasks between them.
Key Advantages of RiceDrive
- Direct cloud-to-cloud transfer: Move files without storing the entire migration on your computer.
- Browser-based setup: Connect accounts and create transfer tasks without command-line tools.
- Background processing: After the task starts successfully, it can continue while the browser is closed.
- Selective migration: Transfer specific files, project folders, or Team Folder content instead of moving everything at once.
- Task options: Depending on the current plan and connection, available settings may include scheduling, filtering, and incremental transfer.
- Transfer records: Review completed, skipped, and failed items from the task details or logs.
- Free testing traffic: New users can use the available free traffic to test the workflow before a larger migration.
What to Check Before Migrating
1. Confirm Zoho WorkDrive Permissions
Make sure the connected Zoho account can open and download every folder you intend to transfer. Team Folders, shared files, or organization-controlled accounts may have restrictions that prevent third-party access.
2. Check OneDrive Storage
Confirm that the destination account has enough available storage. Leave extra space for duplicate files, retried items, and any additional data created during the migration.
3. Review Names and Folder Depth
Look for very long file paths, restricted names, special characters, duplicate filenames, deeply nested folders, and exceptionally large files. These are common causes of migration errors.
4. Decide What Must Be Preserved
File content and folder structure are different from platform-specific data. Sharing links, comments, activity history, versions, custom metadata, and workflow settings may require separate handling.
5. Run a Small Test
Transfer a test folder containing Office files, PDFs, images, ZIP files, nested subfolders, long filenames, and at least one large file. Review the results before moving business-critical data.
Step-by-Step: Migrate Zoho WorkDrive to OneDrive with RiceDrive
Step 1: Sign Up for RiceDrive
Visit RiceDrive.com, create an account, and enter the dashboard. The available free transfer traffic is useful for testing the process before a larger migration.

Step 2: Connect Zoho WorkDrive
Open Link Drive, select Zoho WorkDrive, and follow the authorization instructions. Sign in with the account that has access to the files and Team Folders you want to migrate.
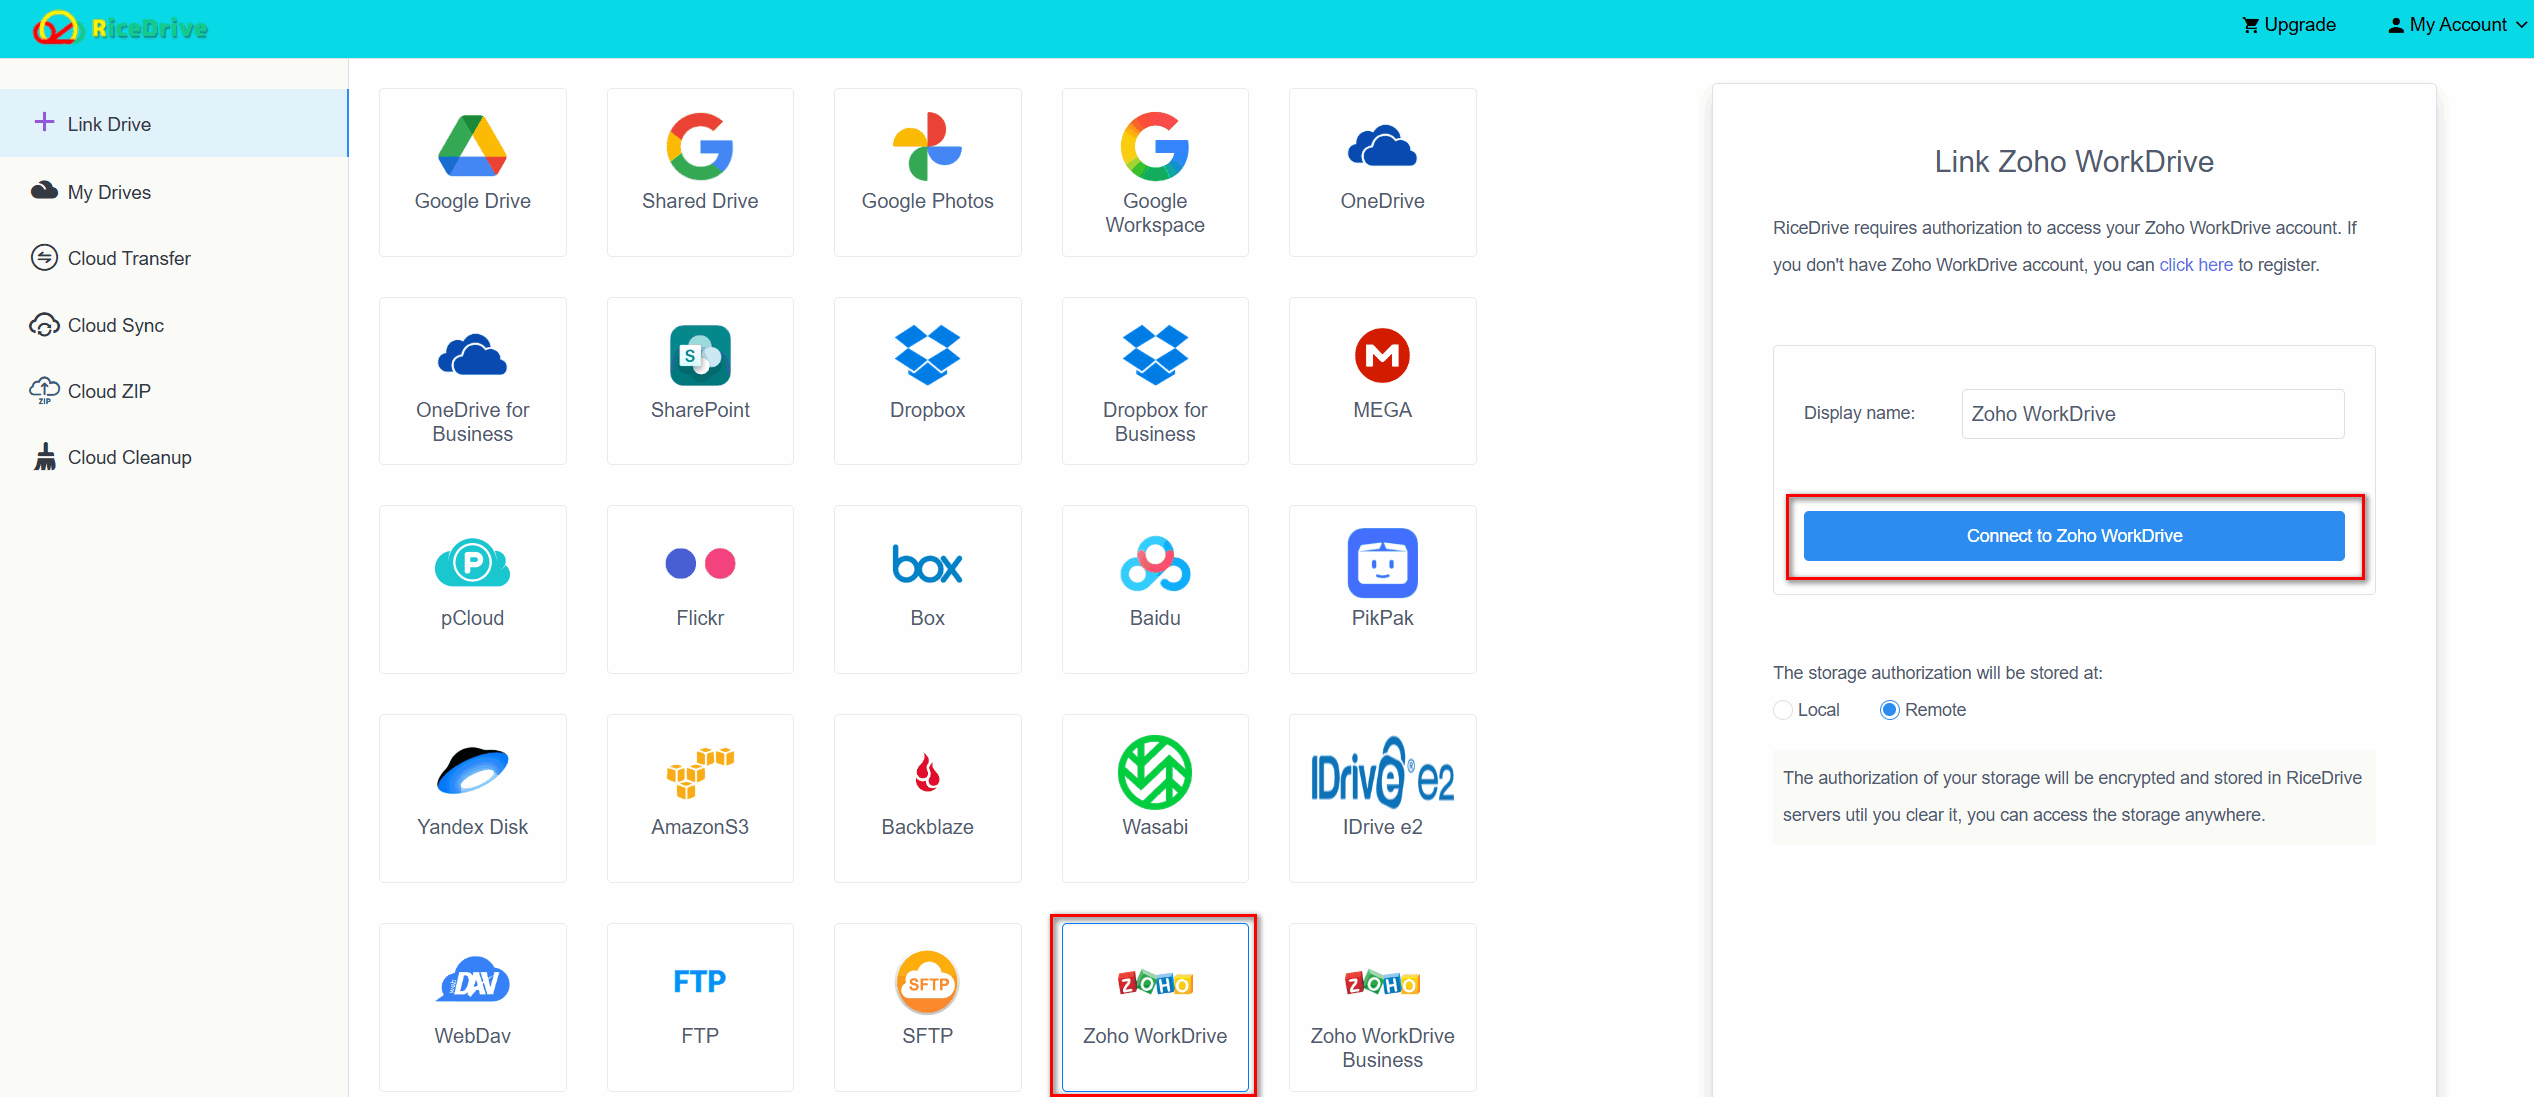
If folders are missing, check whether your organization restricts third-party application access or requires administrator approval.
Step 3: Connect Microsoft OneDrive
Return to Link Drive, select OneDrive, and authorize the destination Microsoft account. Confirm whether you are connecting a personal OneDrive account or the correct Microsoft 365 work or school account.
Step 4: Create a Cloud Transfer Task
Open Cloud Transfer and create a new transfer task. Choose Zoho WorkDrive as the source, select the required files or folders, and choose OneDrive as the destination.
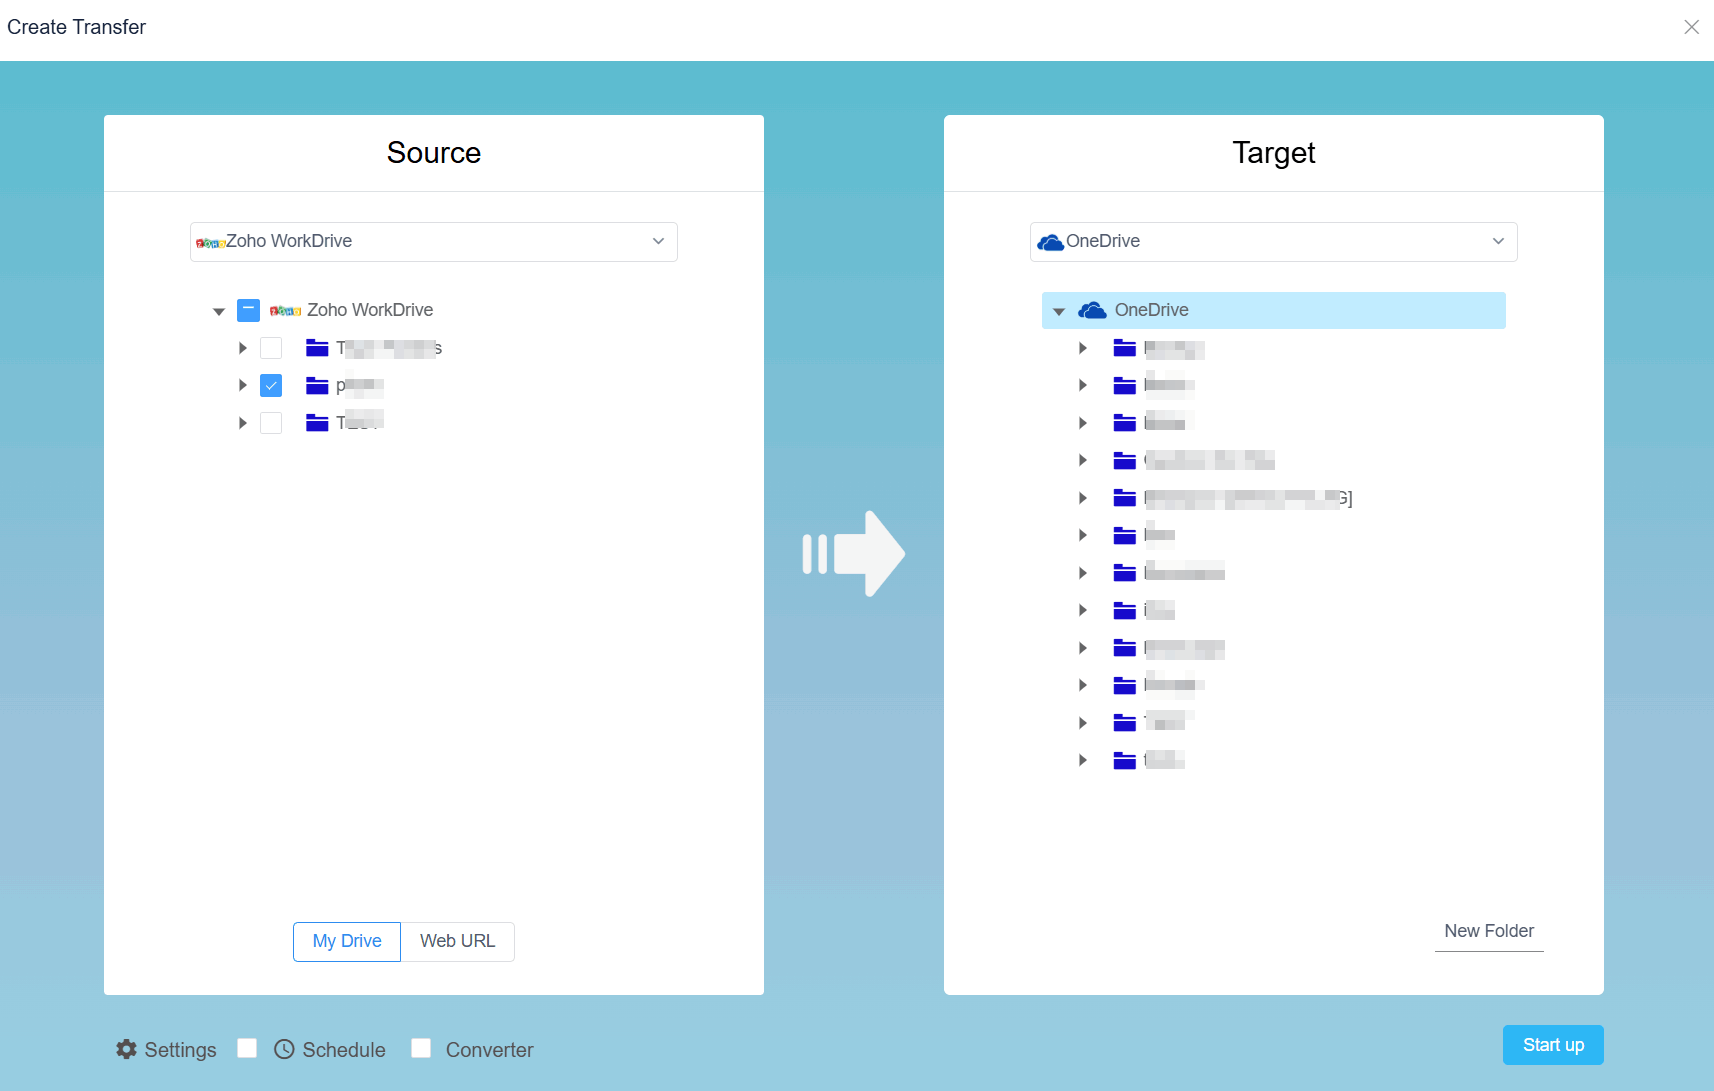
Step 5: Configure Transfer Options
Review the options available for the current account and connection. You may be able to schedule the task, filter files, control duplicate handling, or use incremental transfer for a later update.
For large business migrations, divide the data by department, project, year, or top-level folder. Smaller tasks are easier to verify and retry.
Step 6: Start the Migration
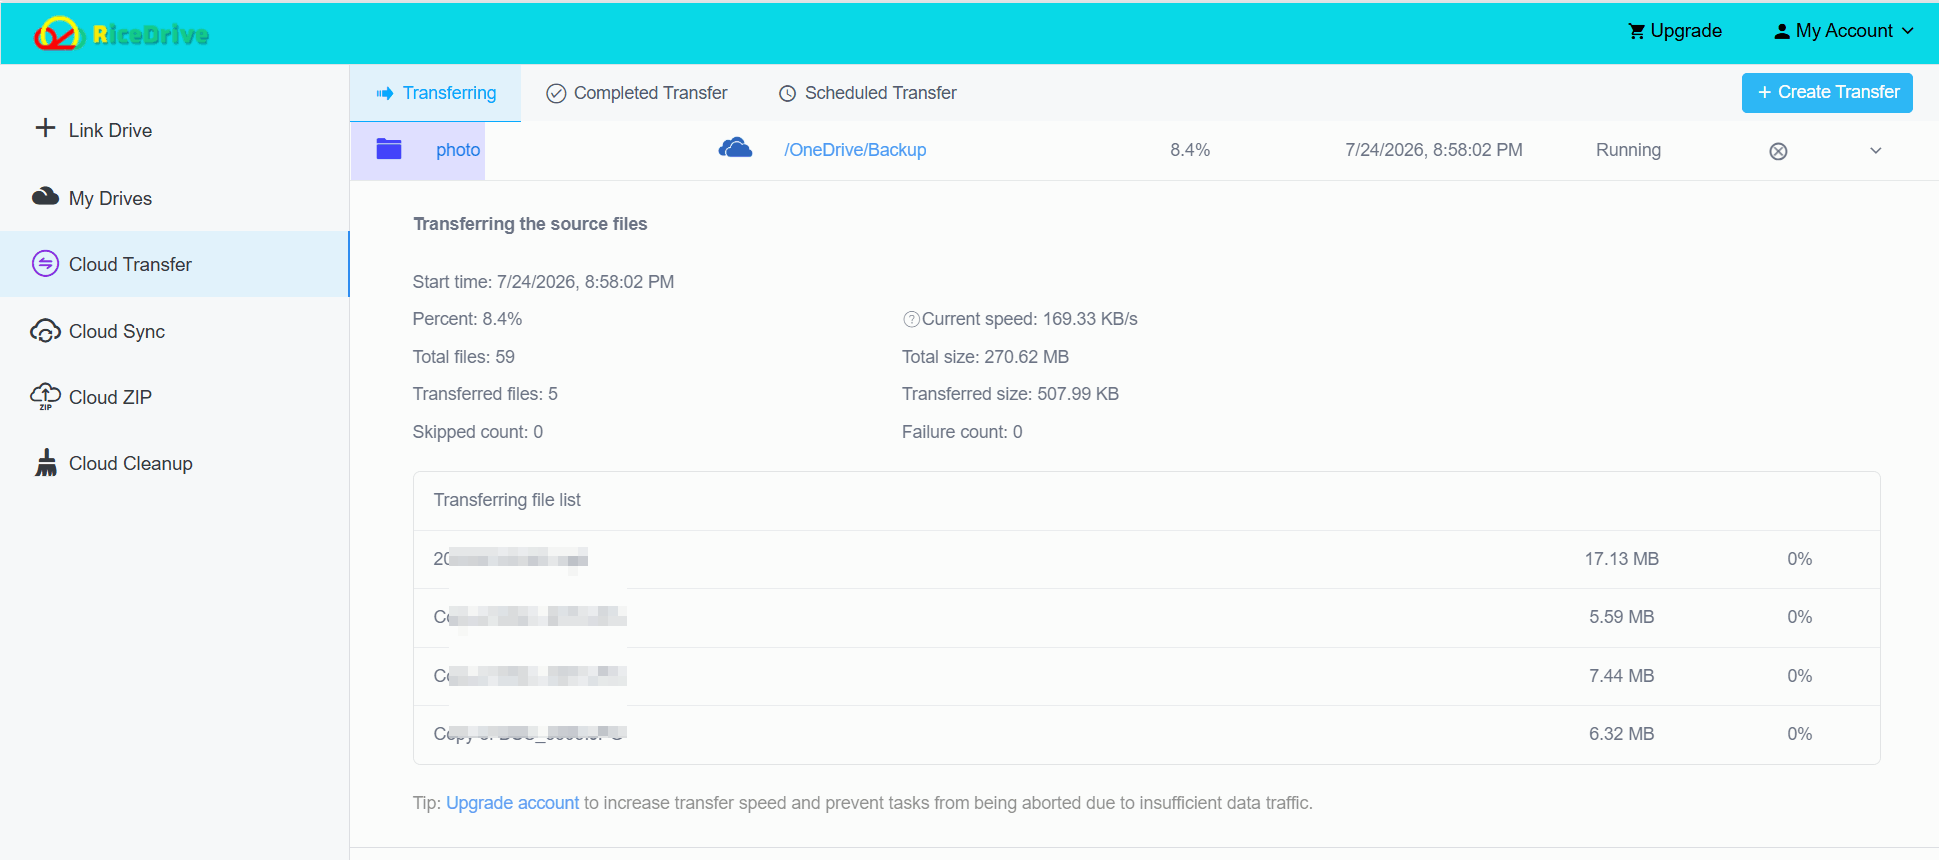
Confirm that Zoho WorkDrive is the source, OneDrive is the destination, the correct folders are selected, and the destination has sufficient storage. Start the transfer and monitor it from the RiceDrive task list.
Transfer time depends on the total data size, number of files, folder depth, account permissions, provider limits, and temporary service conditions. Thousands of small files can take longer than a few large files with the same total size.
Step 7: Review Transfer Logs
After the task finishes, inspect its details for completed, skipped, and failed files. Pay attention to permission errors, invalid filenames, quota problems, expired authorization, and provider restrictions.
Step 8: Verify the Files in OneDrive
Open OneDrive separately and inspect the destination folder. Check top-level folders, nested subfolders, recent documents, large files, PDFs, images, Office files, and business-critical data. Open several important files to confirm they are accessible.
Post-Migration Verification Checklist
- Confirm all required top-level folders are present.
- Open representative files from every important department or project.
- Compare large and business-critical file sizes.
- Review every failed or skipped item in the task log.
- Check whether filenames or folder paths were changed.
- Recreate Microsoft 365 sharing permissions and links.
- Keep Zoho WorkDrive available until users approve the result.
Alternative Free Method: Download and Upload
For a small amount of data, you can migrate files manually without a third-party transfer service.
- Download from Zoho WorkDrive: Select the required files or folders and choose Download. Zoho packages folders or multiple selected items into a ZIP archive. Large downloads may be scheduled instead of processed immediately.
- Extract locally: Unzip the downloaded archive and confirm that the folder structure is complete.
- Upload to OneDrive: Open the destination folder in OneDrive and upload the extracted files, or use the OneDrive desktop synchronization application.
See Zoho's official instructions for downloading files and folders from WorkDrive.
Drawbacks: The manual method requires local storage, uses bandwidth for both the download and upload, may require ZIP extraction, provides limited migration reporting, and is difficult to manage when files fail in the middle of a large transfer.
RiceDrive vs. Manual Migration
| Feature | RiceDrive | Manual Download and Upload |
|---|---|---|
| Local download required | No | Yes |
| Large local disk required | No | Often |
| Cloud-to-cloud workflow | Yes | No |
| Background processing | Yes, after the task starts successfully | Limited |
| Scheduled tasks | Available for supported tasks | No |
| Transfer logs | Yes | Limited |
| Suitable for large folder collections | More suitable | Less suitable |
| Computer bandwidth usage | Lower dependency | Used for both download and upload |
Important OneDrive Limitations to Know
Before starting the migration, review Microsoft's current restrictions. Limits can change, so confirm them on the official OneDrive and SharePoint restrictions page.
| Limit Type | Current Microsoft Guidance |
|---|---|
| Maximum individual file upload/download size | 250 GB |
| Maximum decoded file path | 400 characters, including the filename |
| Individual path segment when synced locally | Up to 255 characters, subject to operating-system limits |
| Available storage | Depends on the OneDrive or Microsoft 365 plan |
| Restricted names and characters | Some names, characters, temporary files, and environment-specific file types may be blocked |
Very deep Zoho WorkDrive folder structures can exceed OneDrive's path limit. Shorten repeated folder names and long filenames before migration when practical.
What May Not Transfer to OneDrive?
A cloud migration normally focuses on file and folder content. Do not assume that every Zoho WorkDrive collaboration feature will be recreated in OneDrive.
- Zoho WorkDrive sharing links
- Team Folder roles and permissions
- Comments and file discussions
- Activity history and audit information
- Previous file versions
- Labels, custom metadata, or approval workflows
- Zoho-specific document and collaboration settings
After the files arrive, rebuild the required access using Microsoft 365 users, groups, OneDrive sharing settings, Teams, or SharePoint. Avoid creating public links unless they are necessary.
Migration Best Practices
Transfer Data in Batches
Divide a large migration by department, project, year, client, or top-level folder. Smaller tasks make troubleshooting and approval more manageable.
Reduce File Changes During Migration
Ask users not to rename, move, or replace important source files while their folders are being transferred. For an active workspace, complete an initial migration and then run a final update before switching users to OneDrive.
Keep a Migration Record
Record the source account, destination account, selected folders, task date, status, failed files, retries, and approval result. This creates a useful audit trail for business data.
Do Not Delete the Source Too Early
Keep Zoho WorkDrive available until transfer logs are reviewed, critical files have been opened, permissions are rebuilt, and the relevant users or administrators approve the migration.
Frequently Asked Questions
Conclusion: Migrate Zoho WorkDrive to OneDrive More Easily
Moving from Zoho WorkDrive to OneDrive does not have to mean downloading every file and uploading it again. RiceDrive provides a direct online workflow: connect both cloud accounts, select the source folders, choose a OneDrive destination, configure the task, and review the results after completion.
For a reliable migration, check permissions and available storage first, run a small test, divide large transfers into batches, review task logs, verify important files, rebuild sharing permissions, and keep the original Zoho WorkDrive data until the migration is approved.
🚀 Ready to migrate Zoho WorkDrive to OneDrive?
Start Free Migration →10GB free traffic • No local download required • Review logs after transfer