Introduction
Migrating your files from PikPak to pCloud can be a daunting task, especially if you have large amounts of data. The traditional approach of downloading everything to your local computer and then re-uploading to pCloud is time‑consuming, bandwidth‑heavy, and prone to interruptions. Fortunately, in 2026, there are smarter ways to transfer PikPak to pCloud without downloading any files to your device. This guide explores the best methods, with a strong focus on using RiceDrive – a powerful cloud‑to‑cloud transfer service that handles the migration entirely on the server side.
Whether you're switching cloud providers, consolidating storage, or just exploring better options, this article will walk you through each approach, highlight the pros and cons, and show you exactly how to complete the migration quickly and securely.
Why Migrate from PikPak to pCloud?
Before diving into the "how", let’s briefly cover the "why". Both PikPak and pCloud are excellent cloud storage services, but they cater to different needs:
- PikPak is known for its fast download speeds and integration with torrents and online videos, making it a favorite among users who frequently download large media files.
- pCloud offers robust file management, end‑to‑end encryption options (pCloud Crypto), lifetime plans, and excellent sharing capabilities. It’s more of a full‑fledged file management and backup solution.
Reasons to migrate include:
- Consolidating files into one primary cloud service.
- Taking advantage of pCloud’s security features or lifetime pricing.
- Moving away from PikPak’s storage limits or regional restrictions.
Whatever your reason, the migration process doesn’t have to be painful.
Method 1: Manual Download & Upload (Not Recommended)
The most straightforward – but least efficient – method is to manually download all your files from PikPak to your local computer, then upload them to pCloud. Here’s the typical workflow:
- Log in to PikPak and download each file/folder to your PC.
- Log in to pCloud and upload the same files from your PC.
- Delete the local copies to free up space.
Why this is a bad idea:
- Time‑consuming: For large volumes (hundreds of GB or TB), this can take days or even weeks.
- Bandwidth waste: You use your internet connection twice (download + upload), which may incur costs or throttling.
- Storage bottleneck: You need enough free space on your local drive to hold all the files temporarily.
- Risk of data loss: Interrupted downloads or uploads can lead to incomplete transfers.
We strongly advise against this method unless you have only a few small files.
Method 2: Use RiceDrive for Direct Cloud‑to‑Cloud Transfer (Recommended)
RiceDrive is a dedicated cloud migration service that connects directly to both PikPak and pCloud via their official APIs. It transfers files between the two clouds without ever downloading them to your device. This server‑side transfer is fast, secure, and uses zero of your local bandwidth.
Key benefits of RiceDrive:
- No download/upload: All data moves between cloud servers.
- Preserves folder structure: Your files and folders remain organized.
- Handles large volumes: Supports transferring individual files larger than 100 GB, subject to the connected cloud provider’s limits.
- 10GB free traffic to get you started.
- Secure and encrypted – uses OAuth for authentication; your credentials are never stored.
Step‑by‑Step Guide with RiceDrive
Follow these simple steps to migrate PikPak to pCloud using RiceDrive:
- Create a RiceDrive account – go to RiceDrive
login and sign up for free.

- Add your PikPak account – click “Add Cloud” and select PikPak. Authorize
RiceDrive to access your PikPak files (read‑only permission).
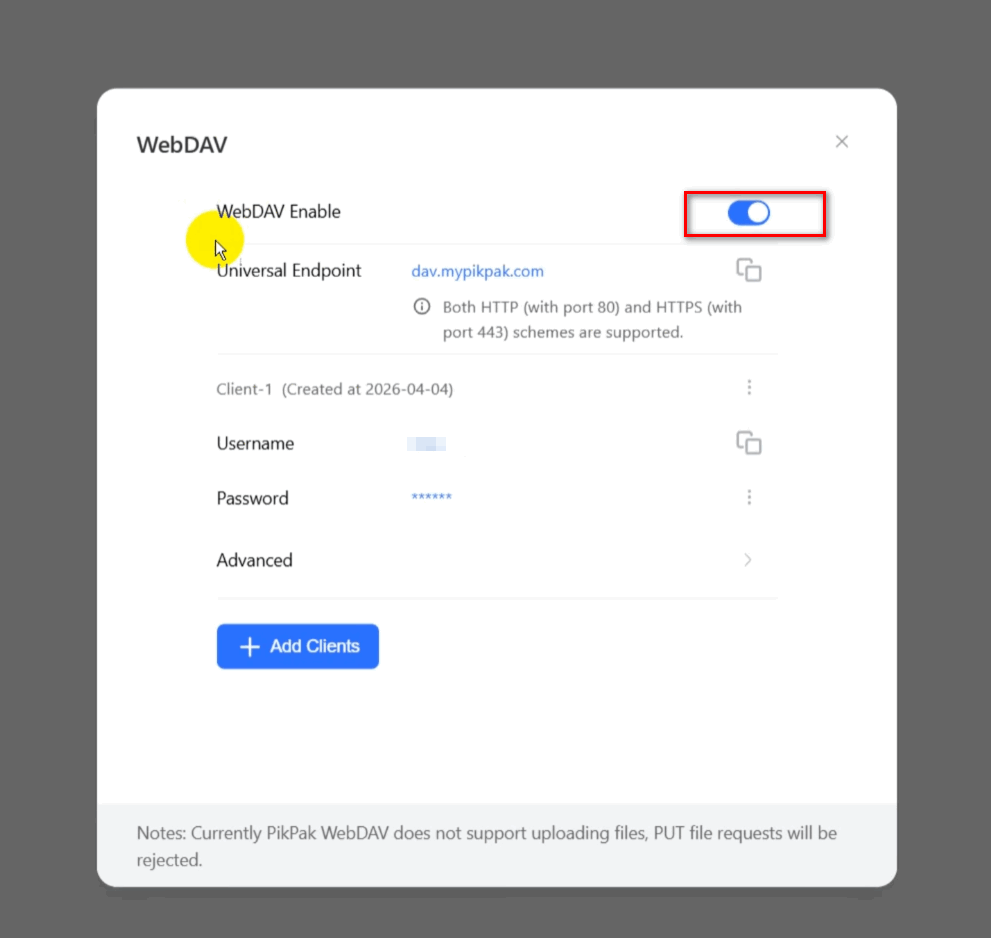
- Before you add PikPak to RiceDrive, you need to enable WebDAV in your PikPak account.
- Go to the official PikPak website, log in to your account, and open the settings page. Then enable the WebDAV feature.
-
After WebDAV is enabled, PikPak will provide the connection information you need, including: Server Host, Username, Password.
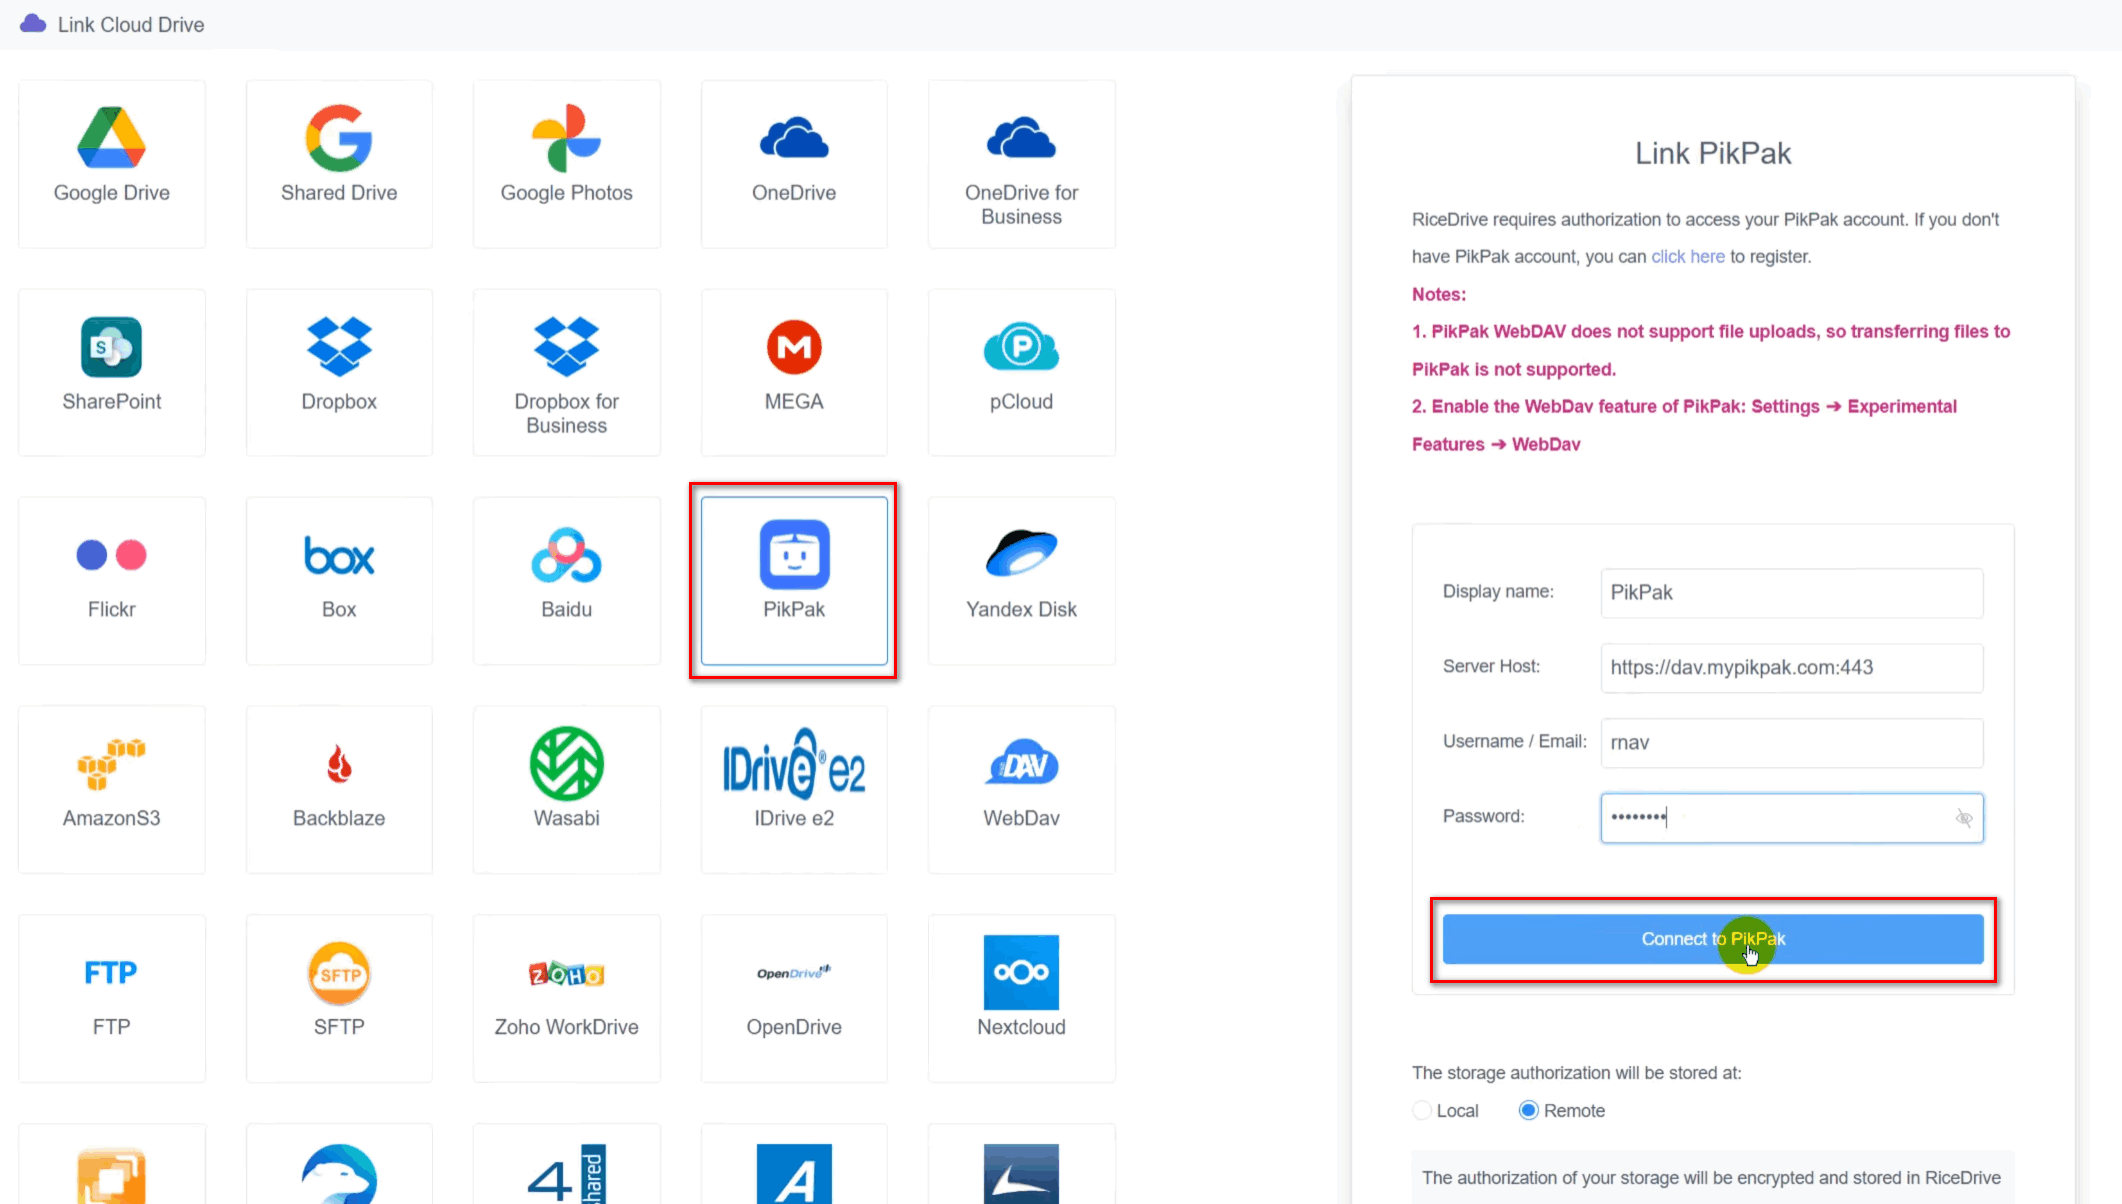
- Open the Link Drive page in RiceDrive.
- Choose PikPak or WebDAV as the cloud storage type, then paste the Server Host, Username, and Password into the matching fields.
-
After filling in the information, click the connect button.
- Add your pCloud account – similarly, click “Add Cloud” and choose pCloud. Grant the necessary permissions (write access to upload files).
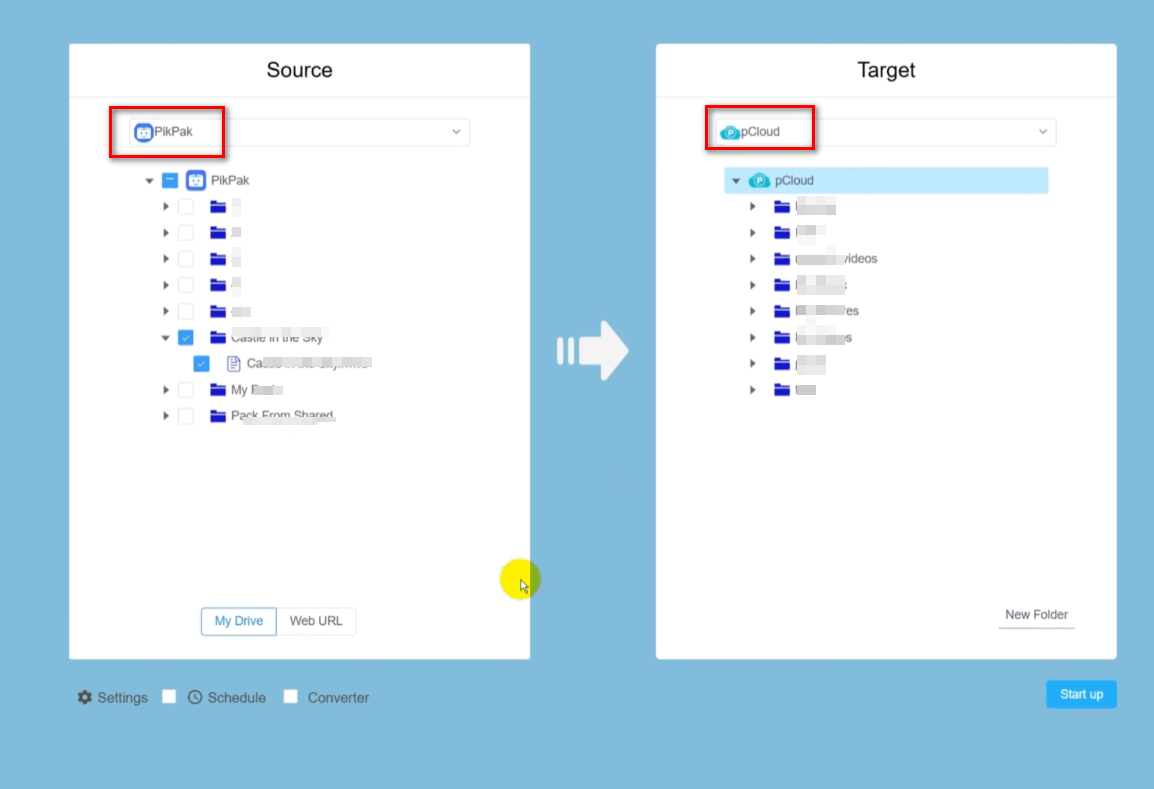
- Create a new transfer task – select PikPak as the source and pCloud as the
destination. You can choose specific folders or the entire root.
- Configure options – you can enable “Preserve timestamps”, “Skip existing files”, or “Overwrite” based on your needs.
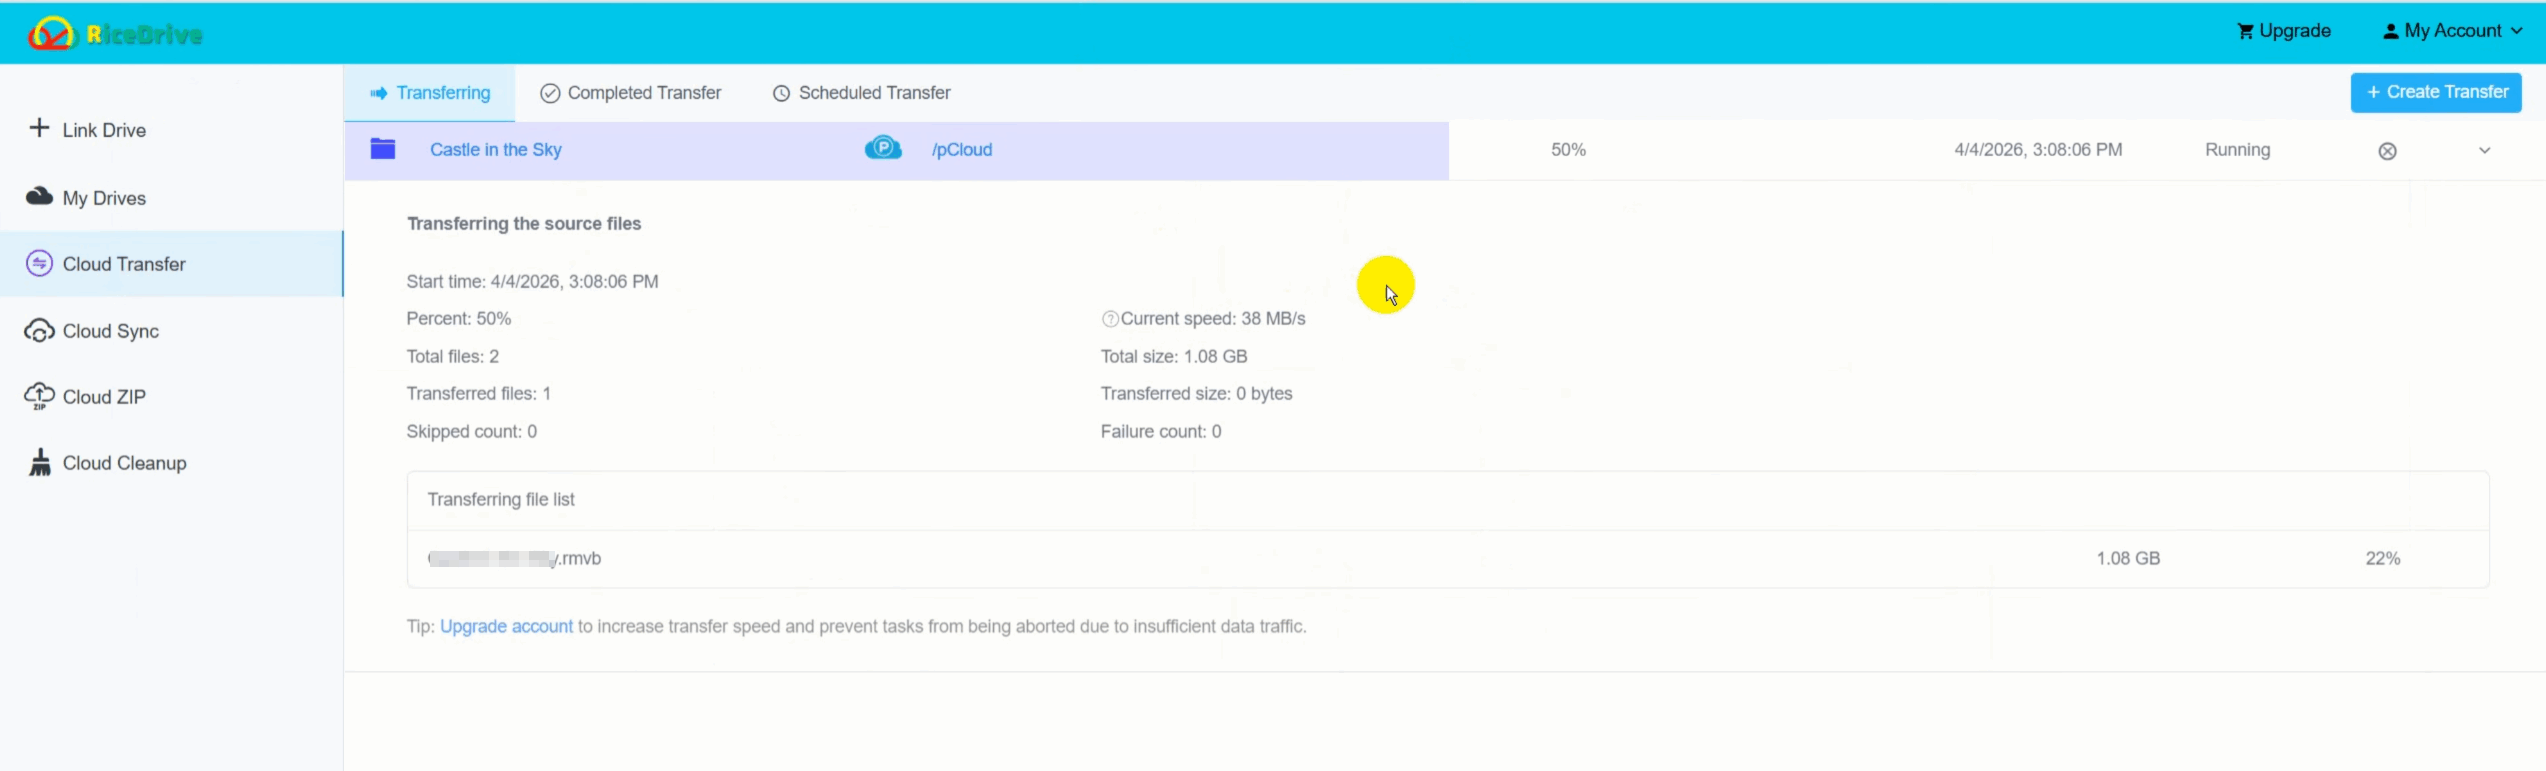
- Start the transfer – click “Start” and monitor the progress in real time.
You can pause and resume at any time.
- Verify – once completed, check your pCloud account to ensure all files are
present and intact.
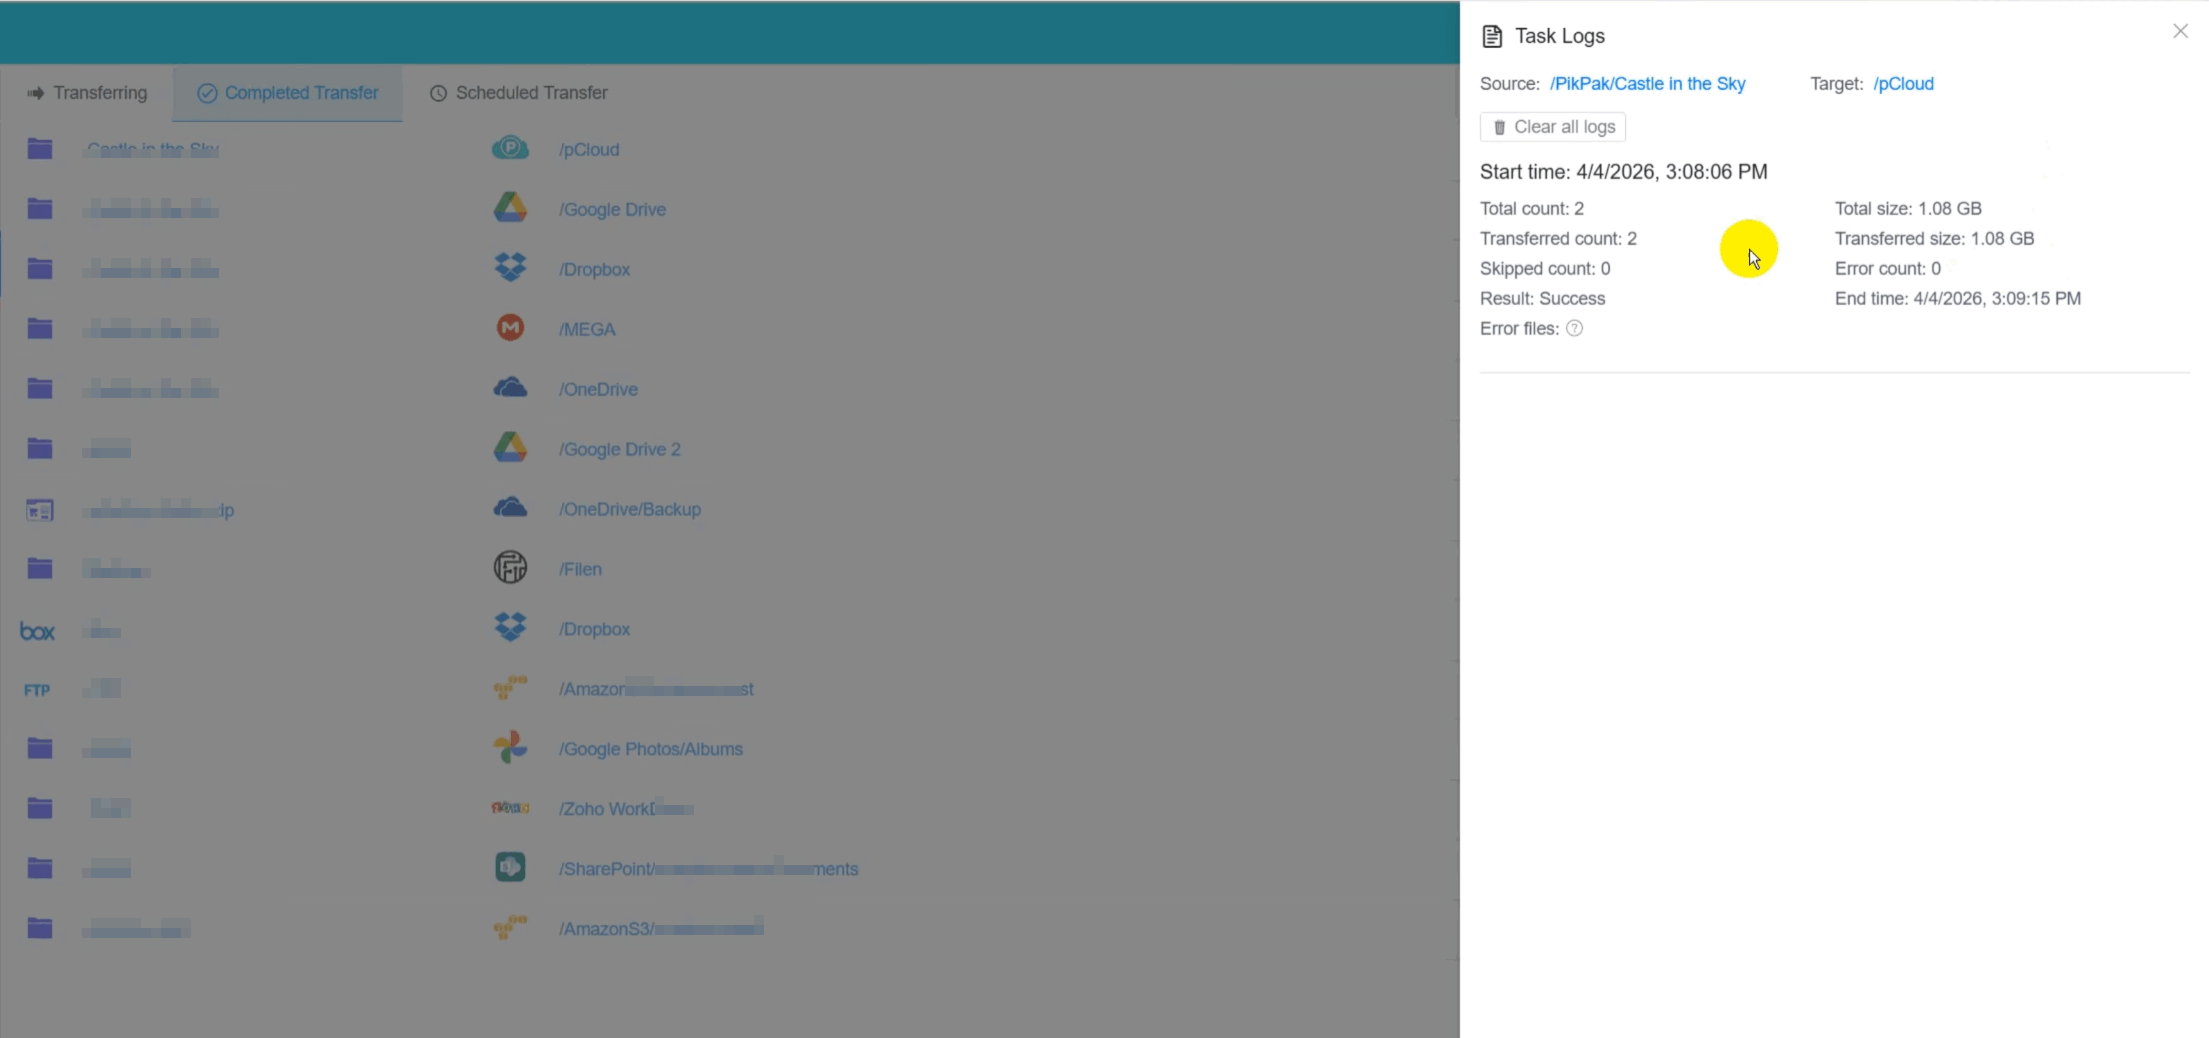
RiceDrive also provides detailed logs so you can see exactly which files were transferred, skipped, or failed (if any). The entire process is transparent and user‑friendly.
Method 3: Other Third‑Party Tools
While RiceDrive is our top recommendation, a few other services offer similar cloud‑to‑cloud transfer capabilities:
- MultCloud – supports PikPak and pCloud, but often has slower speeds and higher pricing for large data.
- CloudFuze – enterprise‑oriented, may be overkill for individual users.
- rclone – a command‑line tool that can be configured to work with both clouds, but requires technical expertise and still uses your local machine as a relay (unless you have a server).
For most users, RiceDrive offers the best balance of ease, speed, and affordability – with a generous free tier.
Comparison of Methods
| Method | Download Required? | Speed | Cost | Ease of Use |
|---|---|---|---|---|
| Manual (Download + Upload) | ✔ Yes | Slow (depends on local internet) | Free (uses your bandwidth) | Easy but tedious |
| RiceDrive Recommended | ✖ No | Fast (server‑side) | Free 10GB, then affordable plans | Very easy |
| MultCloud / CloudFuze | ✖ No | Medium | Paid (no free tier for large transfers) | Moderate |
| rclone (with VPS) | No (if using remote server) | Variable | Server cost + expertise | Difficult |
Tips for a Smooth Migration
- Plan ahead: Identify which files/folders you actually want to move. You don’t have to transfer everything.
- Check storage quotas: Ensure your pCloud account has enough free space to accommodate the files.
- Run a test: Transfer a small folder first to verify everything works as expected.
- Use a stable internet connection: Even though RiceDrive uses server‑side transfer, your browser needs to stay connected to monitor progress.
- Organize after migration: Once the transfer is complete, you can reorganize folders in pCloud without affecting the source.
Frequently Asked Questions
Is RiceDrive safe to use?
Yes. RiceDrive uses OAuth 2.0 authentication, meaning your cloud credentials are never stored on their servers. All transfers are encrypted in transit.
How long does the transfer take?
It depends on the total file size and the API rate limits of both cloud providers. Typically, you can expect speeds of 5‑20 MB/s per file, with parallel transfers for multiple files.
Can I migrate large files (e.g., 50GB)?
Yes. As long as both PikPak and pCloud support the file size, RiceDrive can transfer individual files larger than 100 GB without splitting them. Actual limits may vary depending on the cloud provider.
Do I need to keep my computer turned on during the transfer?
No, because RiceDrive processes everything on their servers. You can close your browser and the transfer will continue; you can check progress later.
What if some files fail to transfer?
RiceDrive provides a detailed log and allows you to retry failed items with one click.
Conclusion
Migrating from PikPak to pCloud no longer requires tedious downloading and re‑uploading. With RiceDrive, you can perform a seamless, direct cloud‑to‑cloud transfer that saves time, bandwidth, and effort. Whether you’re moving a few gigabytes or several terabytes, the process is straightforward and secure.
We recommend using RiceDrive for its user‑friendly interface, generous free tier, and reliable performance. Sign up today and get 10GB of free traffic to start your migration. If you have any questions, feel free to explore our other guides or contact our support team.