Can you migrate PikPak to MEGA without downloading files?
Yes. In 2026, you can use RiceDrive to transfer files from PikPak to MEGA online. First enable WebDAV on PikPak, connect both cloud accounts, then select source files and a MEGA destination in Cloud Transfer. RiceDrive runs the job in the background, without requiring a local download and re-upload.
- 7 steps: Sign in → Enable WebDAV → Connect PikPak → Connect MEGA → Select files → Start → Verify.
- 10GB free monthly traffic: suitable for smaller transfers or testing.
- Important: copy PikPak's WebDAV Host, Username and Password exactly, including the host's HTTPS scheme and port.
Why Migrate PikPak to MEGA?
PikPak and MEGA serve different storage preferences. You might move completed downloads out of PikPak, keep a second copy of important media, or consolidate folders in a MEGA account you use for everyday access. A straightforward migration can save time when you have many folders or large files.
The conventional approach is to download everything from PikPak to your computer and then upload it to MEGA. That requires local space and consumes your connection for both parts of the journey. RiceDrive instead lets you create an online cloud-to-cloud transfer task and check its progress later.
What You Need Before Starting
- An active PikPak account with WebDAV enabled on mypikpak.com.
- Your PikPak Server Host, Username and Password from its WebDAV settings.
- An active MEGA account with sufficient available storage and transfer allowance.
- A RiceDrive account to run and monitor the task.
WebDAV host format: include https:// and the port number when shown
by PikPak, for example https://your-domain:port. Use the actual values displayed in
your account settings, not this example address.
How to Transfer PikPak to MEGA with RiceDrive
The steps below follow the supplied RiceDrive tutorial recording in order, from logging in through checking the completed transfer.
Step 1: Sign In to RiceDrive
Visit ricedrive.com and log in using your email address and verification code. Open the cloud connection area to add your storage accounts.
Step 2: Enable WebDAV on PikPak
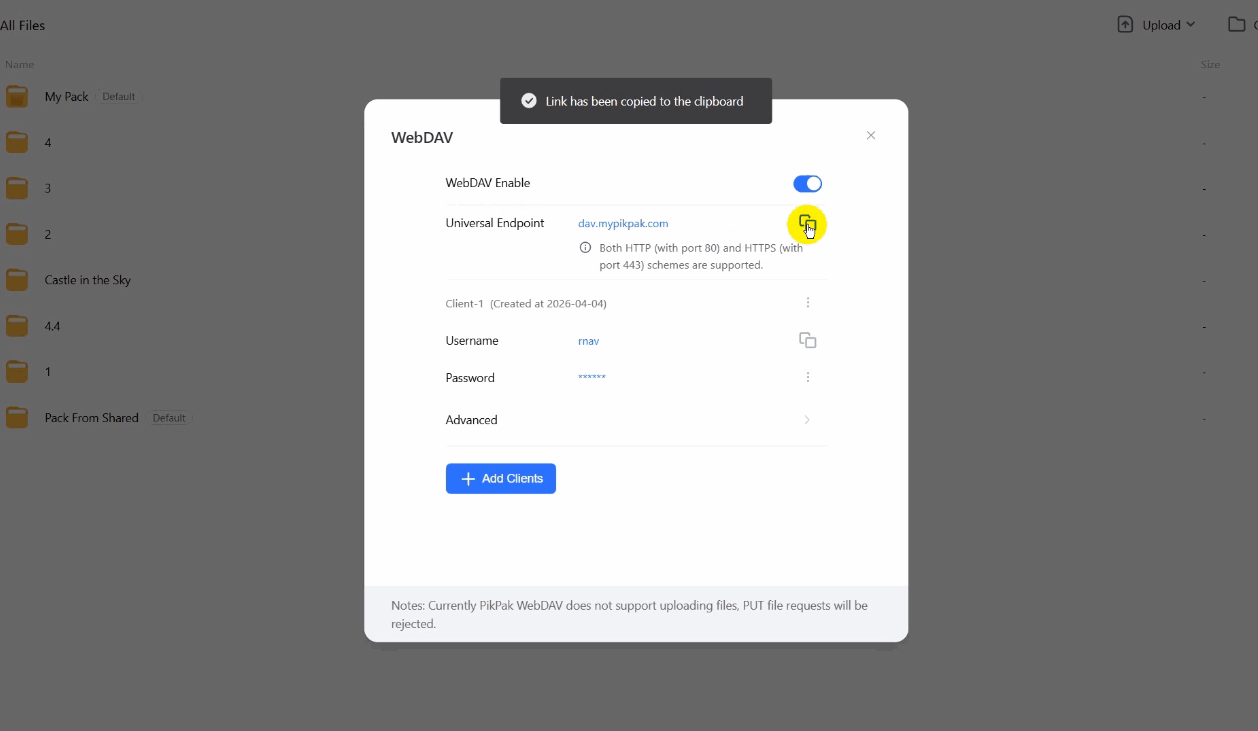
Before connecting PikPak, visit mypikpak.com, sign in, open Settings and enable the WebDAV feature. Copy the displayed Server Host, Username and Password. RiceDrive connects using these WebDAV details rather than a normal PikPak OAuth flow.
Step 3: Connect PikPak to RiceDrive
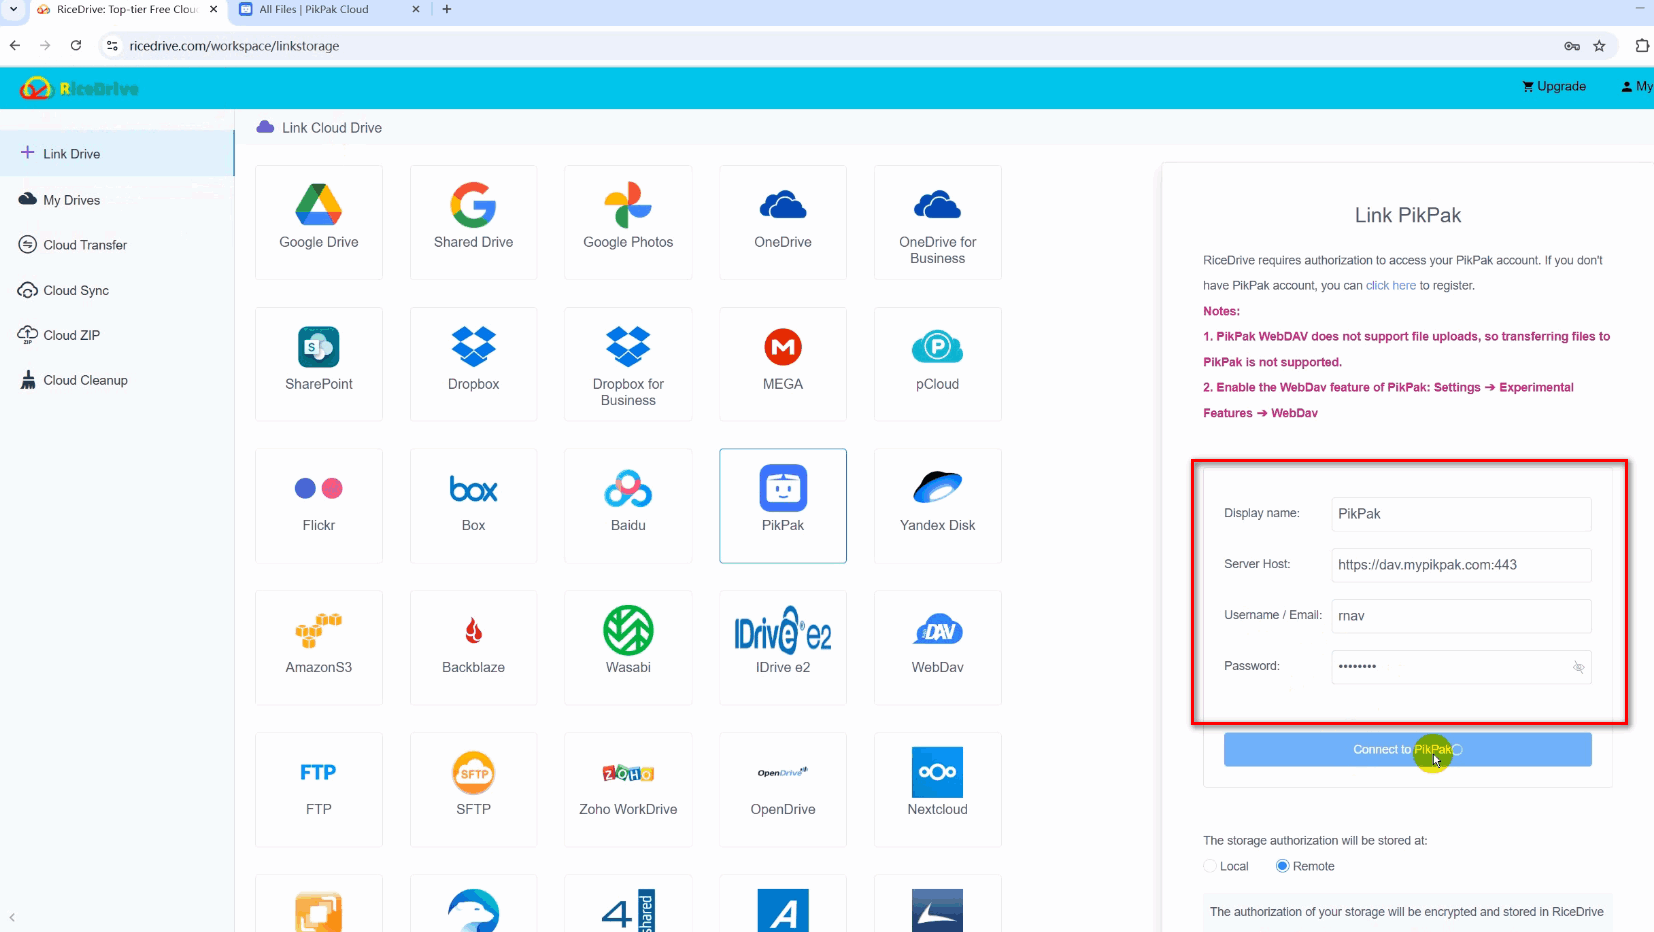
In RiceDrive, add PikPak and paste the Server Host, Username and Password into the matching fields. Make sure the host includes the HTTPS prefix and port. Complete the connection and check that PikPak appears on the My Drives page.
Step 4: Connect Your MEGA Account
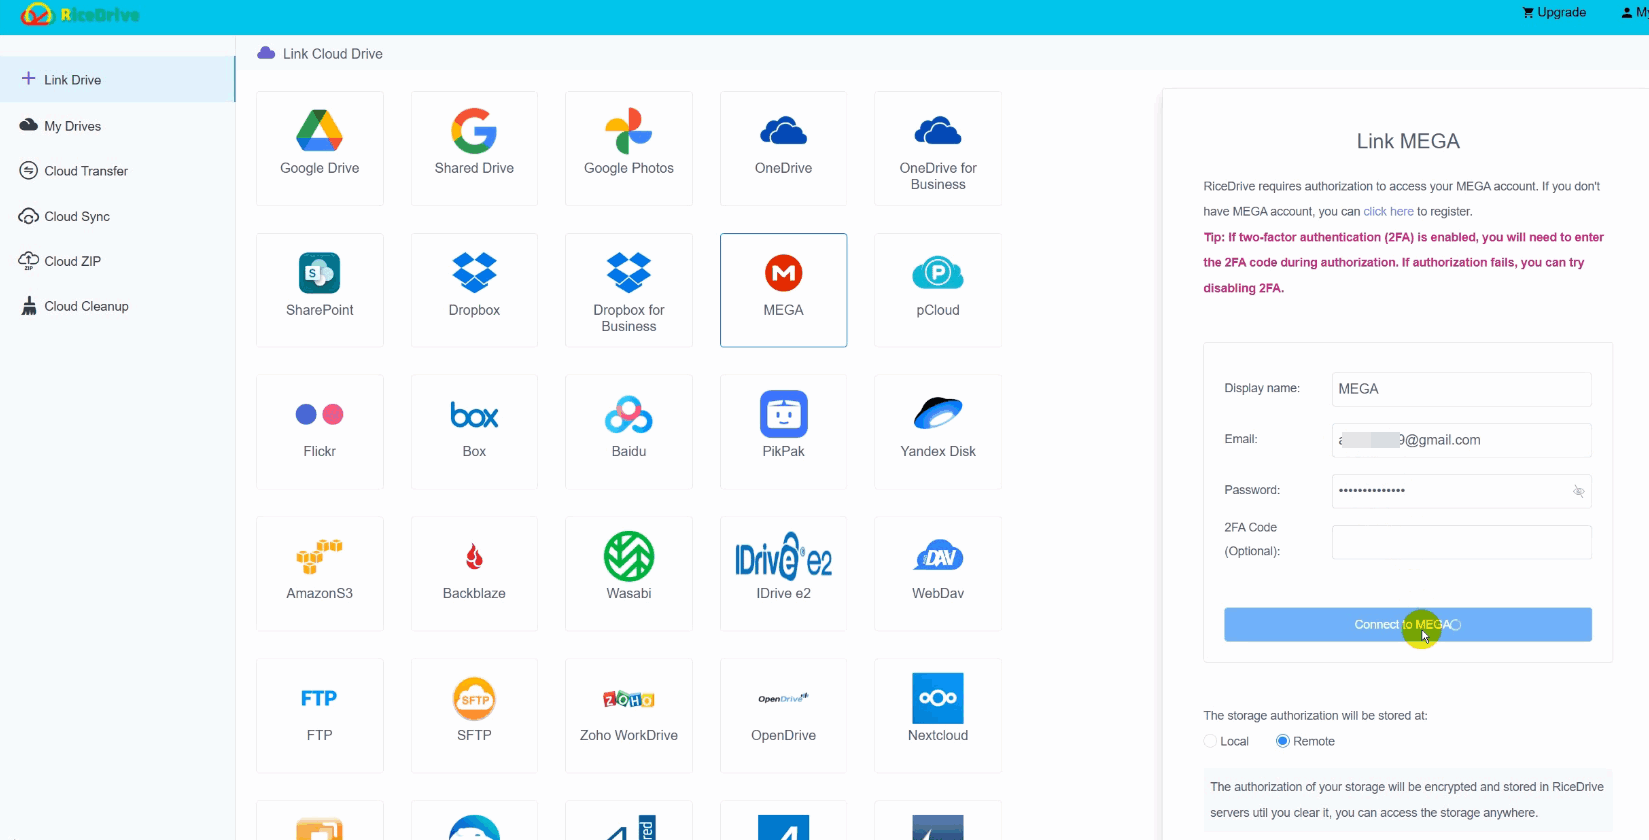
Add MEGA in RiceDrive. Enter your MEGA account credentials in the connection form and click Connect. Wait for the confirmation that MEGA is connected. Both PikPak and MEGA should now appear among your connected storage accounts.
Step 5: Create the Transfer Task
Open Cloud Transfer and select the files or folders you want to move from PikPak. Then select the destination folder in MEGA. Confirm the direction is PikPak → MEGA, not the reverse.
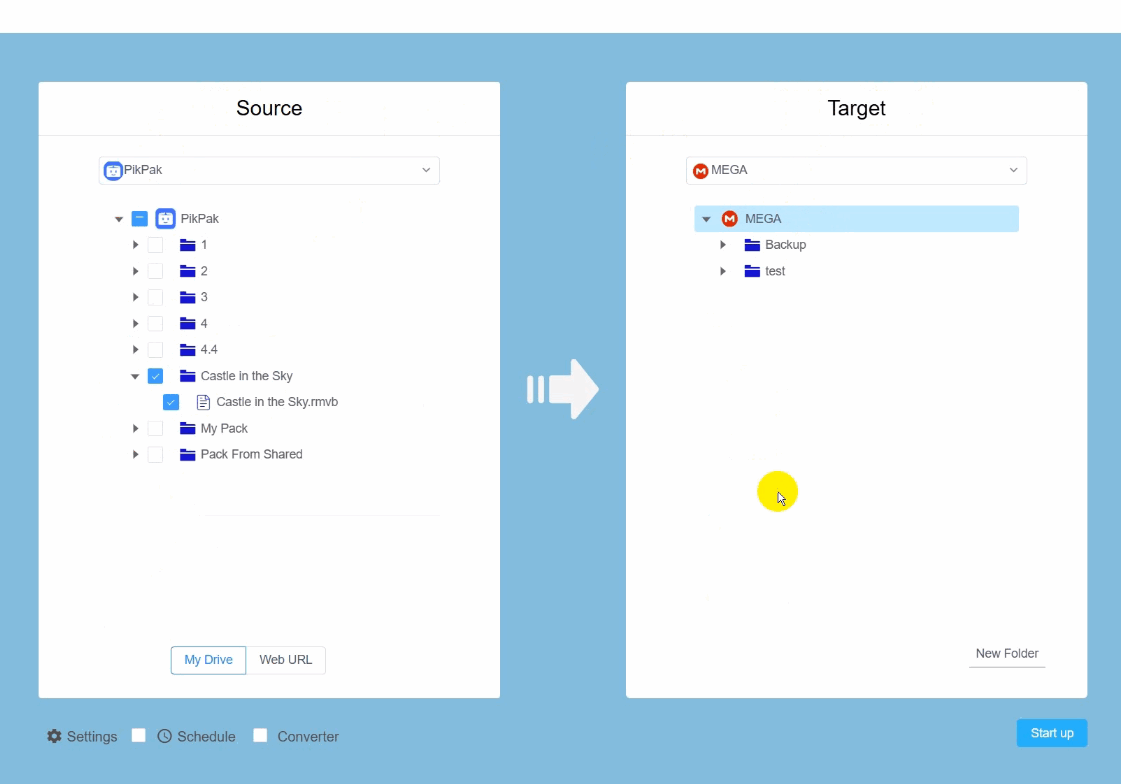
Step 6: Review Options and Click Start
Under task settings, configure file filters and decide how to handle existing files if needed. Under scheduling, choose a daily or weekly plan for repeated tasks. Click Start to create and execute the transfer. You may close the webpage after the job starts; RiceDrive continues working in the background.
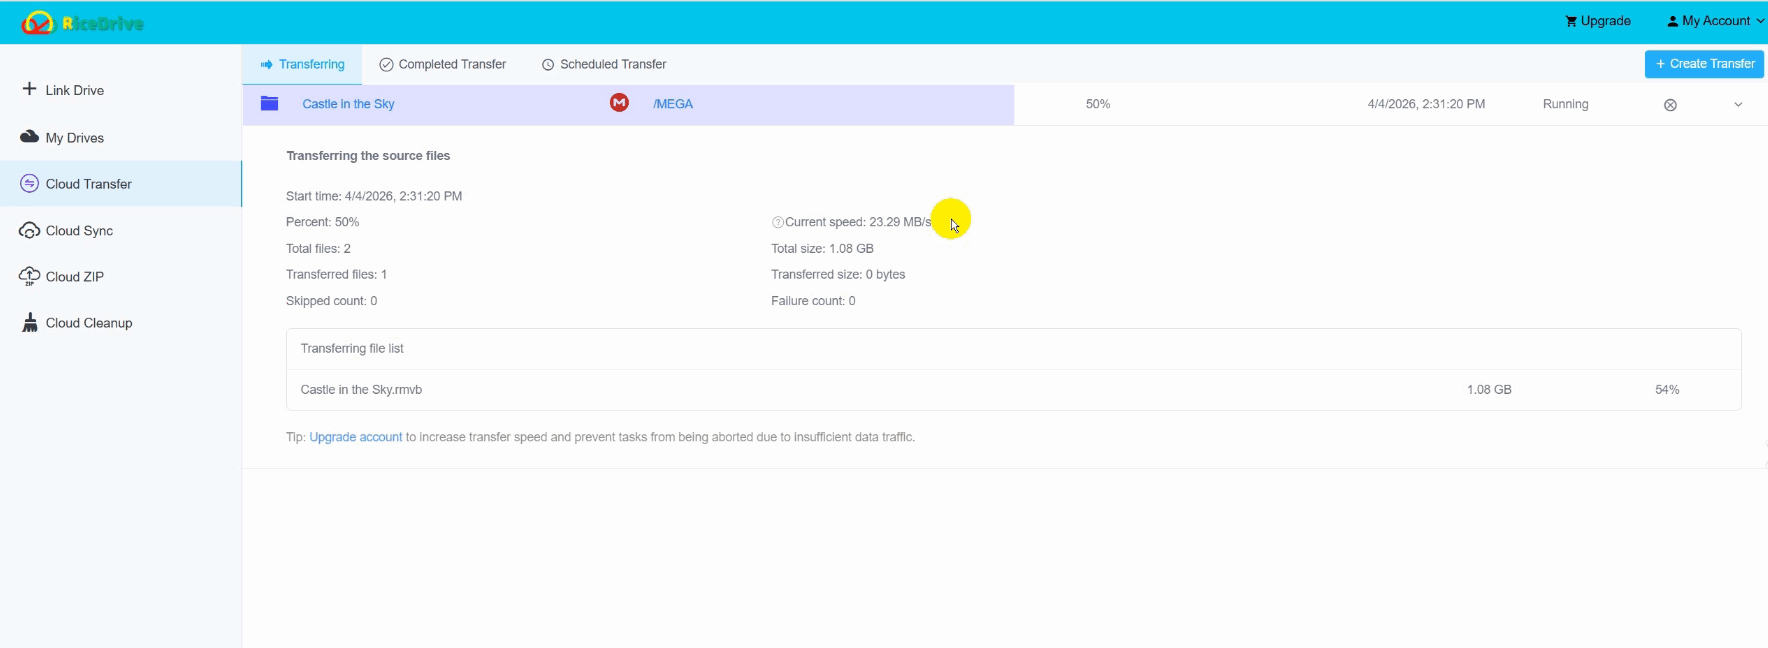
Step 7: Check the Logs and Verify MEGA
When RiceDrive shows the task as completed, open its logs and confirm that the expected files transferred successfully. Finally, open MEGA, verify filenames and folders, and test important files before considering any source cleanup.
Alternative Method: Download from PikPak and Upload to MEGA
If you have only a few small files, you can do the migration manually: download them from PikPak, save them locally, sign in to MEGA and upload them. This avoids using a third-party transfer service, but the intermediate files occupy disk space, and you must manage both downloads and uploads.
For larger collections, consider transferring a test folder first using RiceDrive to make sure your WebDAV connection and MEGA destination work as expected.
RiceDrive vs Manual Transfer
| Feature | RiceDrive | Manual Download & Upload |
|---|---|---|
| Local copy required | No | Yes |
| Transfer when browser is closed | Yes, after task starts | Usually no |
| Recurring schedule | Daily or weekly options | Manual repetition |
| Progress / verification | Task status and logs | Check both apps manually |
| Good for | Multiple folders and repeat jobs | A few small files |
Important Limits and Safety Checks
- MEGA storage and transfer quotas: available capacity and transfer allowances depend on the receiving account and its plan.
- WebDAV access: verify that PikPak's endpoint is enabled and reachable. An incorrect host, username, password or port can prevent connection.
- Shared links: public links or sharing permissions from PikPak should not be expected to migrate identically to MEGA.
- Files already at the destination: review overwrite, rename or skip behavior before starting a repeated task.
- Keep originals: a successful task status does not replace checking the transfer logs and opening a few files in MEGA.
Common Problems and How to Fix Them
RiceDrive Cannot Connect to PikPak
Reopen PikPak's WebDAV settings. Confirm the feature is enabled and copy the host, username and
password again. The host must include https:// and its specified port; do not omit
either part.
MEGA Connection or Transfer Fails
Verify the MEGA credentials and available account storage. If a task reports errors, check RiceDrive logs before retrying. Quotas, authentication and provider restrictions can interrupt transfers.
Some Files Are Missing After Transfer
Check filters and existing-file settings, then compare the source and destination folder structures. Retry only failed or missing items where your task settings support doing so.
Frequently Asked Questions
Final Thoughts
You do not have to download an entire PikPak library just to place another copy in MEGA. With PikPak WebDAV enabled, RiceDrive offers a clear online path: connect PikPak, connect MEGA, select folders, configure options, start, and verify. The supplied tutorial confirms that the task can continue after the webpage is closed and provides logs for the final check.
Start with a small folder, make sure the results appear correctly in MEGA, and keep the original PikPak files until you are satisfied that the migration is complete.
🚀 Ready to move PikPak files to MEGA?
Start Free PikPak to MEGA Transfer →10GB free monthly traffic • Online tasks • No manual re-upload