In today's digital age, cloud storage has become an essential tool for individuals and businesses alike. With cloud services like OneDrive, you can store and access your files from anywhere, anytime. However, there may come a time when you need to transfer your OneDrive files to another cloud storage service, whether it's for better pricing, more storage space, or improved features. Fortunately, with the help of a cloud transfer service like RiceDrive, this process has become much easier and more efficient.
RiceDrive: Your Ultimate Cloud Transfer Solution
RiceDrive is a powerful cloud-to-cloud transfer and management solution that allows you to seamlessly transfer files between different cloud storage services. With RiceDrive, you can easily migrate your OneDrive files to another cloud service, such as Google Drive, MEGA.nz,Dropbox, or pCloud, without the need to download and re-upload files locally.
Next, click 'Link storage' and select MEGA and Google Drive from the list. Sign in to authorize RiceDrive to securely access your accounts.
Here's a step-by-step guide on how to use RiceDrive to transfer your OneDrive files to another cloud service in 2024:
Step 1: Sign Up for RiceDrive
Go to the RiceDrive website (https://www.ricedrive.com) and sign up for a free account. You can either create a new account or sign in with your existing Google, Facebook, or Microsoft account.
Step 2: Add Your Cloud Accounts
Once you've signed in, click on the "Add Cloud" button to add your OneDrive account and the cloud service you want to transfer your files to. RiceDrive supports over 30 leading cloud storage services, including OneDrive, Google Drive, MEGA, Dropbox, pCloud, and more.
Step 3: Grant RiceDrive Access
Follow the on-screen instructions to grant RiceDrive access to your cloud accounts. This process may vary depending on the cloud service, but it typically involves authorizing RiceDrive to access your account.
Step 4: Select Files to Transfer
After adding your cloud accounts, you'll see them listed in the RiceDrive interface. Navigate to the files or folders you want to transfer from your OneDrive account.
Step 5: Choose a Transfer Destination
Right-click on the files or folders you want to transfer and select "Cloud Transfer" from the context menu. In the pop-up window, choose the destination cloud service where you want to transfer your files.
Step 6: Transfer Options
RiceDrive offers several advanced transfer options to ensure a smooth and efficient transfer process. You can choose to:
-
Transfer files with their existing directory structure or merge them into a single folder.
-
Preserve or remove file metadata, such as creation and modification dates.
-
Enable or disable file versioning for the transferred files.
-
Set a transfer speed limit to optimize network usage.
Step 7: Start the Transfer
Once you've reviewed and configured the transfer options, click the "Transfer Now" button to initiate the file transfer process.
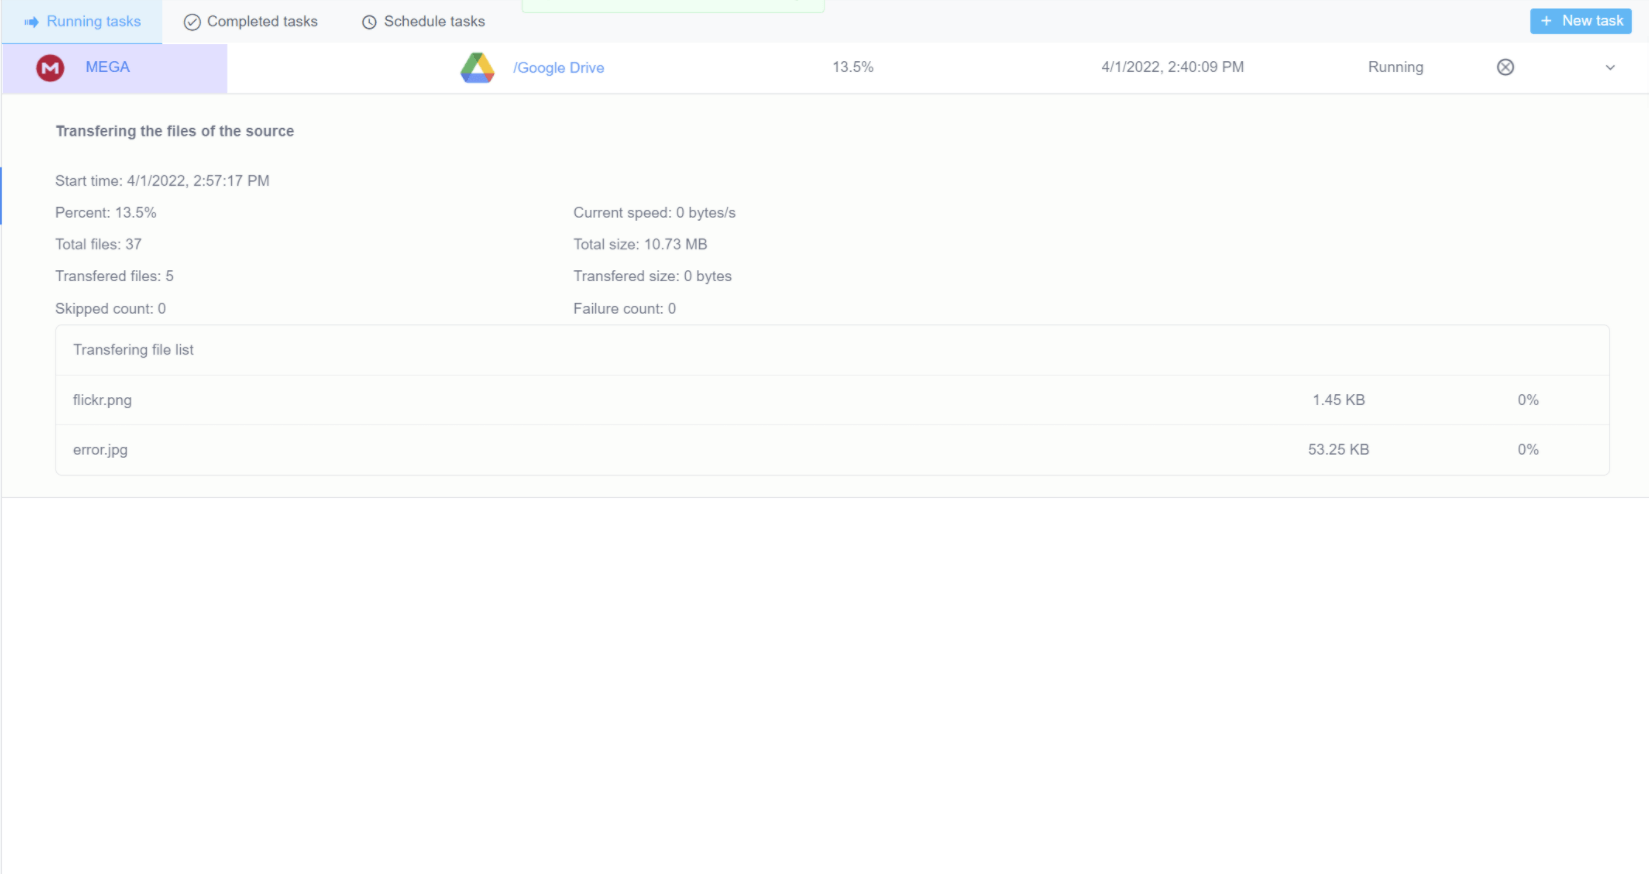
Step 8: Monitor and Manage Transfers
RiceDrive provides a dedicated "Transfer" section where you can monitor the progress of your ongoing transfers and manage completed transfers. You can pause, resume, or cancel transfers as needed.
Advanced Features of RiceDrive
While the primary function of RiceDrive is to facilitate cloud-to-cloud file transfers, the service offers several additional features that can enhance your cloud management experience:
-
Cloud Explorer RiceDrive's Cloud Explorer allows you to browse, manage, and access files across all your connected cloud accounts from a single interface. You can create, rename, move, copy, and delete files and folders, as well as download and upload files directly from the RiceDrive interface.
-
Cloud Sync RiceDrive's Cloud Sync feature enables you to synchronize files and folders between different cloud services automatically. This can be particularly useful if you need to keep your files synchronized across multiple cloud accounts for backup or collaboration purposes.
-
Cloud Transfer In addition to transferring files between cloud services, RiceDrive also supports transferring files between cloud accounts of the same service. This can be handy if you need to consolidate or reorganize your files within a single cloud service.
-
Remote Upload With RiceDrive's Remote Upload feature, you can upload files from a URL or torrent directly to your cloud storage without having to download them to your local device first. This can save time and bandwidth, especially when dealing with large files
-
Scheduled Transfers and Syncs RiceDrive allows you to schedule transfers and syncs to run automatically at specific times or intervals. This can be particularly useful for backup or maintenance tasks, ensuring that your files are always up-to-date and transferred to the desired location.
Advantages of Using RiceDrive for Cloud-to-Cloud Transfers
Using RiceDrive to transfer your OneDrive files to another cloud service offers several advantages over traditional methods, such as downloading and re-uploading files locally:
-
Time and Bandwidth Efficiency Cloud-to-cloud transfers with RiceDrive eliminate the need to download and re-upload files locally, which can be time-consuming and bandwidth-intensive, especially for large file sizes or high volumes of data.
-
Seamless Transfer Experience RiceDrive provides a user-friendly interface and straightforward process for transferring files between cloud services, making the entire experience seamless and hassle-free.
-
Support for Multiple Cloud Services With support for over 30 leading cloud storage services, RiceDrive ensures that you can transfer files between virtually any combination of cloud services, including OneDrive, Google Drive, Dropbox, pCloud, and more.
-
Advanced Transfer Options RiceDrive offers a range of advanced transfer options, such as preserving file metadata, enabling file versioning, and setting transfer speed limits, allowing you to customize the transfer process to suit your specific needs.
-
Centralized Cloud Management Beyond file transfers, RiceDrive provides a centralized platform for managing and accessing all your cloud accounts, making it a comprehensive solution for your cloud storage needs.
Conclusion
Transferring files between cloud storage services can be a daunting task, especially when dealing with large amounts of data or multiple cloud accounts. With RiceDrive, you can streamline this process and enjoy a seamless, efficient, and user-friendly experience. Whether you're migrating your OneDrive files to another cloud service or simply reorganizing your cloud storage, RiceDrive's cloud-to-cloud transfer capabilities and advanced features make it an invaluable tool for modern cloud users in 2024 and beyond.
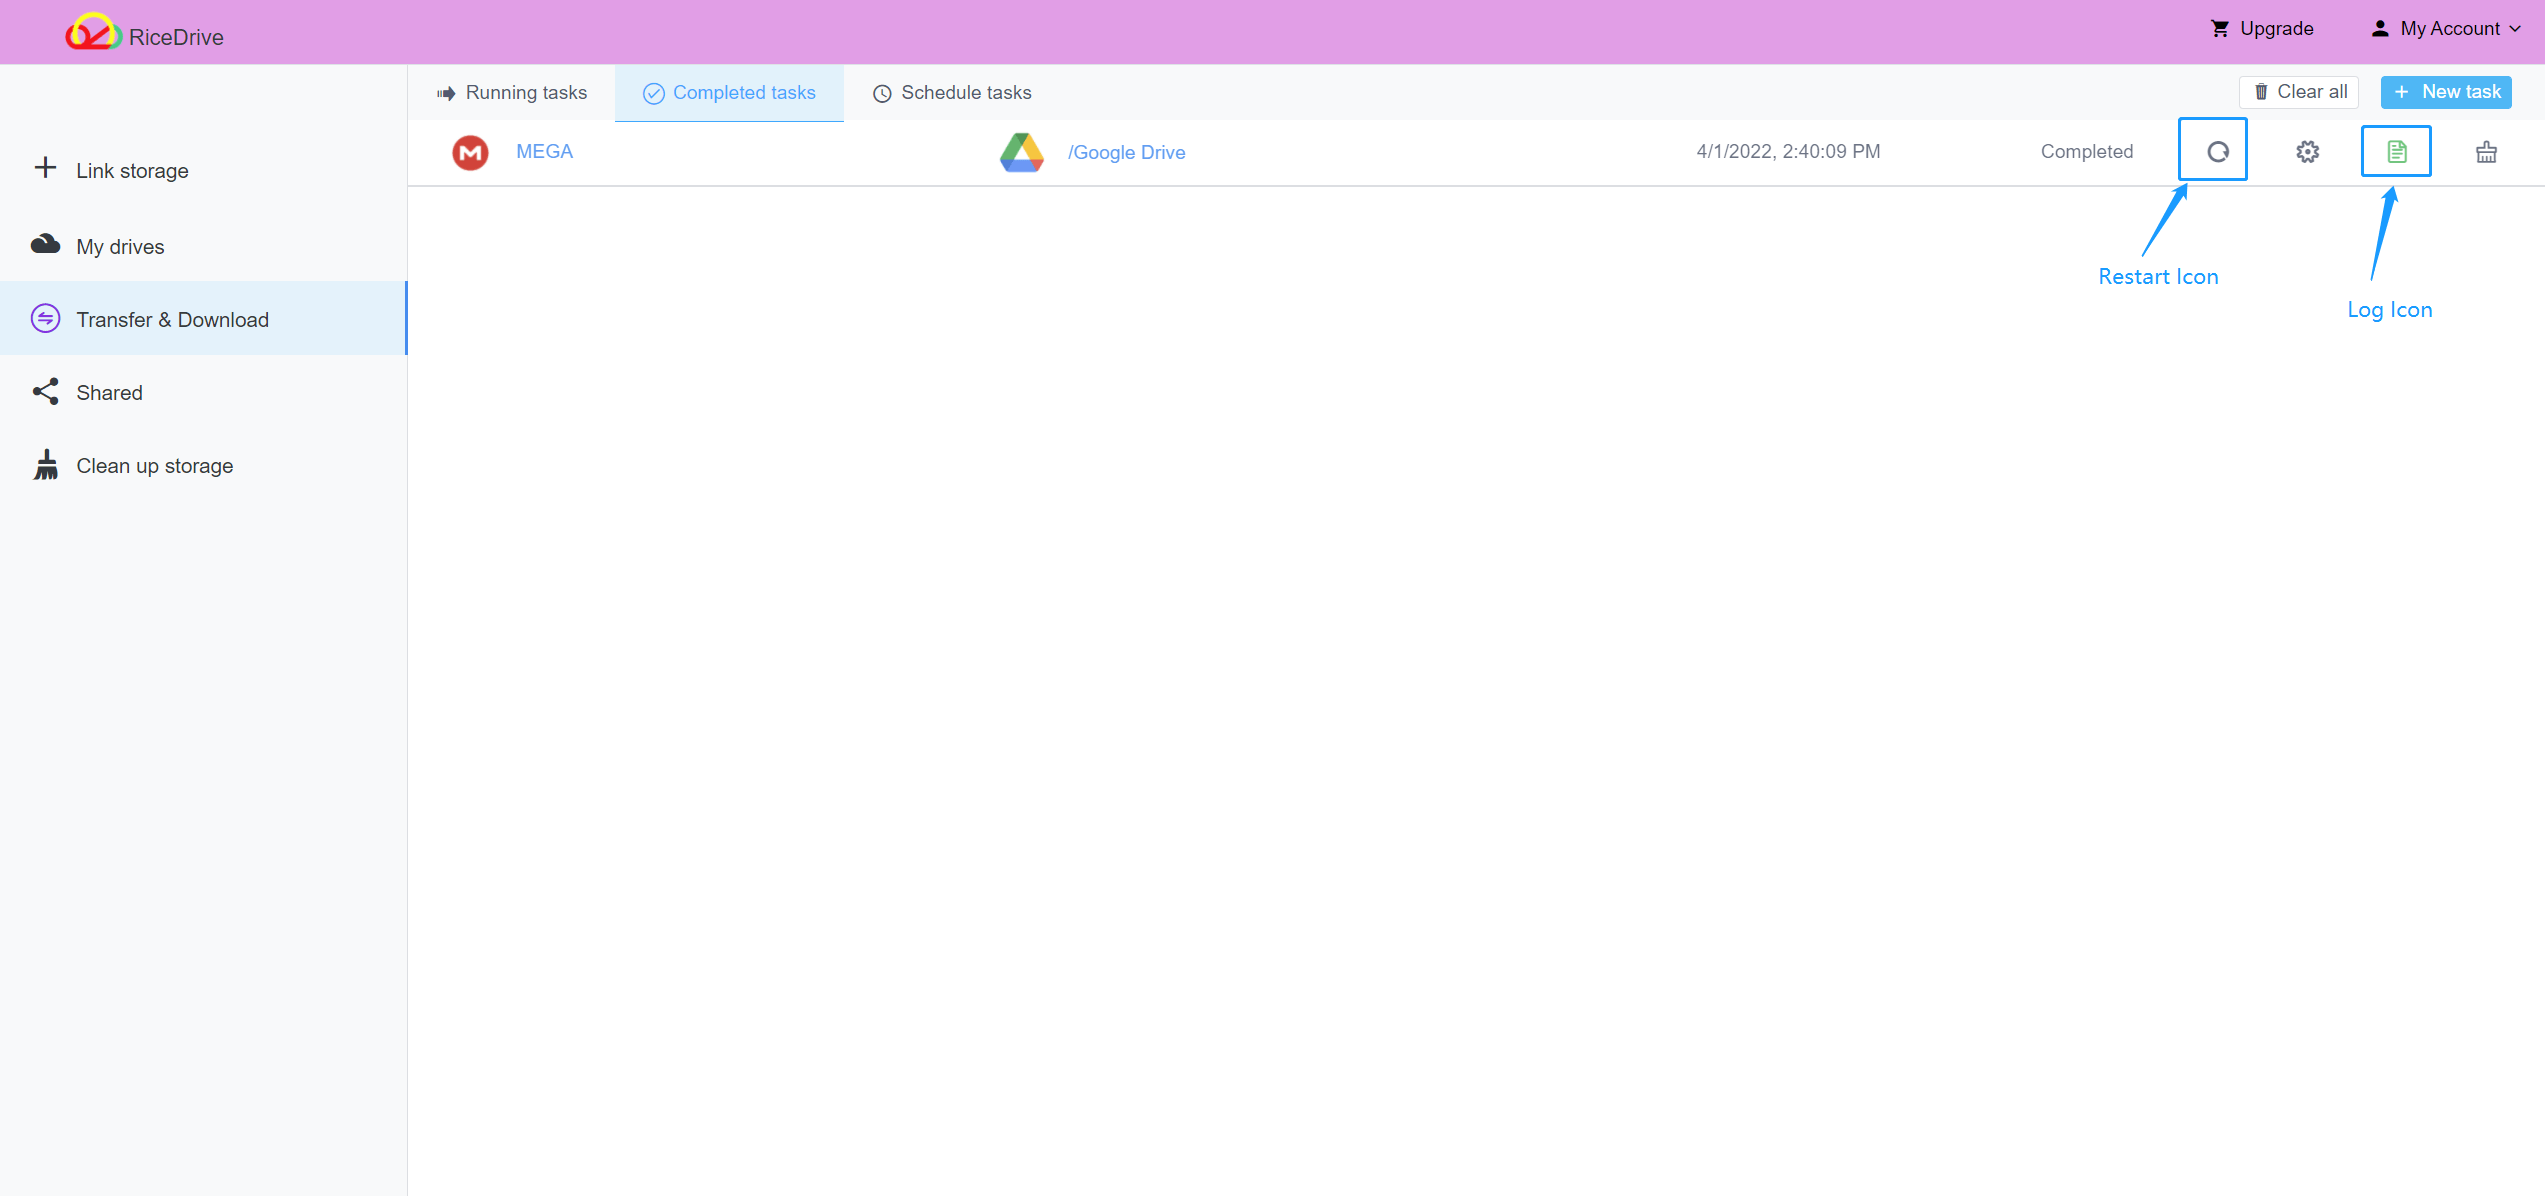
Check the task log. The log icon is green, indicating that all files have been successfully transferred. The log icon is yellow or red, indicating there are files that failed to be transferred.
Migrating to a new cloud provider doesn't have to be a challenge. RiceDrive streamlines the process with easy cloud-to-cloud transfers. No need install, connect your accounts, select your content, and migrate. With RiceDrive handling the backend work, you can seamlessly shift MEGA files to Google Drive in just a few clicks.
Step 5 - File transfer failed
With transferring a large number of files, it's inevitable that a small number of files may fail to transfer. You can click the Restart icon to rerun the task, and RiceDrive will intelligently identify the failed files and retry transferring them, while skipping files that were already successful. Here is an article that explains in detail (How to resolve file transfer failures).
Things to Note When Transferring
When transferring files from Mega to Google Drive, there are a few things to note:
-
If the Mega files you want to transfer contain any shared files or folders, you cannot directly transfer them. You need to log in to mega.nz and process them first before transferring. The steps are:
- Log in to mega.nz
- Create a new folder
- Copy the files or folders you want to transfer into this new folder
- Finally, select this new folder as source to transfer in RiceDrive
If you do not do this, the shared Mega files may become corrupted and unusable after being transferred.
-
You can transfer up to 750GB of files to Google Drive per day, this is Google Drive's limit. Please refer to Google's link for details:
Google Drive's Limits.
Conclusion
Consolidate your online workspace and take control of your multi-cloud environment. Ditch the manual downloads and uploads. Let RiceDrive transfer your data between cloud services automatically. Cloud storage migrations are simple when you use powerful platforms like RiceDrive. Sign up today and start moving your MEGA content to Google Drive!